• Food & Wisdom
  • Hello
  • About
  • Contact
Menu

Chef Chelle

  • Food & Wisdom
  • Hello
  • About
  • Contact

The New Carob Cookie Twist

February 15, 2016

I love my peanut butter carob cookie recipe but recently I realized I wanted to try something new and when I actually used a different recipe I realized why: the one I had been using was too heavy and laden with more sugar than I realized. Not only does it use peanut butter but add to that brown sugar and maple syrup. The recipe below only uses brown sugar but also adds carob powder (something I used to put in mine but had stopped doing) for more flavor. You can read the original recipe here although I made several changes (vanilla-flavored soy milk is not something I keep on hand) and I added the carob chips. Next time I’ll also add ¼ cup of ground flax for more nutritional value.

These aren’t very sweet cookies but they’re enough to kill craving for something sweet.


1 cup wheat flour

1 teaspoon baking soda

1/3 cup brown sugar

1/3 cup rolled oats

1 ½ tablespoons carob powder

½ cup milk

½ tablespoon vanilla extract

1/3 cup vegetable oil 1 dash cinnamon

1 cup carob chips


Preheat oven to 350 degrees. Combine all ingredients and drop on a greased cookie sheet about 2 inches apart. Bake 10 -15 minutes (they took 13 minutes in mine but I also made larger cookies). Recipe makes about a dozen cookies.

Comment

Peanut Butter Chocolate Bars

February 8, 2016

The original recipe came from a booklet I got in the mail from Smith’s grocery store (part of the Kroger chain). At first I wasn’t sold on these until they sat in the refrigerator over night– I didn’t like the flavor from the confectioner’s sugar and the graham crackers. But when we ate them the next day, it was like eating candy bar; not too sweet and a nice texture. I also used dark chocolate from Trader Joe’s because I’m not a fan of the regular chocolate chips the recipe called for. Finally, I used a smaller pan to make the bars higher rather than flatter. These definitely have made it onto the list of future desserts, especially for a party.

1 cup butter, melted

2 cups graham crackers crumbs (I whirl them up in the food processor using the pulse button)

2 cups confectioner’s sugar

1 cup plus 4 Tablespoons peanut butter, divided

1 ½ cups chocolate

In a medium bowl, mix together the butter, graham cracker crumbs, confectioner’s sugar, and 1 cup peanut butter until well blended. Press evenly into the bottom of an ungreased square pan.

Microwave the chocolate with the 4 Tablespoons peanut butter on high for 1 minute. Stir. Continue microwaving or stirring every 30 seconds until smooth. Spread over the prepared crust. Refrigerate for at least one hour before cutting into squares and serving. Store bars in airtight container in refrigerator. 

Tags chocolate, peanut butter, bars, dessert, recipe, graham crackers
Comment

French Onion Soup and the Seventies

February 2, 2016

I love French onion soup.

When I think of it, I think of dark seventies steakhouses with tall booths and heavy wooden furniture. And I think of family weddings and events.

Some years ago, I believe after I had moved to Albuquerque, my dad showed me an easy way to make the soup although I don’t remember one detail: it wasn’t broth but it was a juice you could buy in a can (it looked to be the size of those cans of Hawaiian Punch that used to be available– in the days before plastic took over). I didn’t go back to look for the cans recently, instead I went online and found this recipe from epicurious.

And because it had such good reviews, I went ahead and made it. Greg, who told me he doesn’t really like French onion soup, said he liked it (but I think he really liked it because it meant I would make a loaf of bread for it). Still, the best part is the cheese set under the broiler to melt (I used provolone).

Perfect for a cold night and being that it’s only February, we all have at least a few more of those to endure. 

Tags recipe, french onion soup, soup, seventies, bread
Comment

Apple Caramel Cheesecake Bars

January 25, 2016

I don’t think this week’s recipe needs much of an introduction beyond the photo. Decadent is the perfect word. And great for a party, mostly so you don’t eat the whole thing yourself (we took it across the street for a dinner party and then I had Greg take the rest to school to share with his co-workers).

The recipe wasn’t that well written in the actual Costco cookbook but here’s someone who did a nice job making it better (once you get past her commentary about the lack of signs at Costco).

Enjoy!

Tags caramel, cheesecake, apple, dessert, recipe, costco, cookbook, cream cheese
Comment

Chicken Thighs with Tomatillo Sauce

January 18, 2016

I can’t help myself. I love my new Rick Bayless cookbook and after the success of the chipotle meatballs last week, it was hard not to try another recipe from it. I’ve also found that I really like the flavors and the freshness of the food. Sometimes the prep takes a while because there are multiple steps (like making a sauce here) but the recipes are easy to double, leaving you with enough sauce for another meal or to use as a salsa with chips.

I couldn’t find the exact recipe I used on his web site– the link to this one is for pork– so here is what I did differently based on the cookbook recipe:

I doubled the amount of sauce I made so I would have leftover for other meals and snacks. What I like about his tomatillo recipes is that he broils all the ingredients, usually recipes have you boiling the tomatillos but everything else needs to be roasted, too. It’s very easy to throw it all on a pan and then into the oven. And don’t forget to include the juice you find on the pan!

I used regular baking potatoes and cut them in pieces. Also, instead of the poblano chile, I used a green chile sauce we had on hand.

After the sauce has pureed, heat up a tablespoon of oil in a pot and then pour the puree into it. After it’s heated for about four minutes and the consistency of tomato sauce, add about 1 ½ cups of broth or water (I used chicken broth) and a ¼ cup of chopped cilantro. When it’s heated again, it’s ready for use. I used two cups of it for the chicken dish and placed the rest of it in the refrigerator.

I browned five thighs and removed them from the pan and then added the tomatillo sauce and more broth (another 1 cup) and let it reduce (again). Then I added the potatoes, the green chile sauce, a few tablespoons of cilantro, and heated it up. Finally, I added the chicken again and covered the skillet, letting it cook for about 20 minutes until the chicken was cooked.

And I’m guessing this will be even better today, the second day.


Tags tomatillos, chicken, Rick Bayless, recipe
Comment

Chipotle Meatballs Rick Bayless Style

January 12, 2016

I had never used chipotles en adobo– the canned chipotle peppers. For years I saw recipes that called for it and looked once at the store and couldn’t find it so I stopped trying those recipes. But I figured I could find them now at my local grocery store in the Hispanic section and I decided it was time to try them.

What I didn’t anticipate is that because of another ethnic group, the Hispanic foods have been squeezed out at my local Smith’s. I won’t reveal the other group– I think they do deserve space- but I am quite honestly baffled because Mexican food is very popular right now.

That meant I was off to Walmart (I kept hoping Target would have them because I was going there but I wasn’t so lucky) where I stocked up on several cans so I wouldn’t have to go back to Walmart any time soon.

Of course I bought several cans not knowing what they tasted like. I wasn’t disappointed: I loved the smoky flavor. I felt like I was eating BBQ sauce with a kick.

Recently I bought my second Rick Bayless cookbook and this was the first recipe that I tried. I served it with diced baked potatoes but next time (and Greg has assured me there should be a second time) I’ll do mashed potatoes. The meatballs are easy to make and the sauce could be used for a variety of dishes.

Find the recipe here.

Tags chipotle, chipotle en adobo, Rick Bayless, recipe, meatballs, Mexican food
1 Comment

Resetting with a Beet Smoothie

January 5, 2016

I have been seeing a Chinese doctor for acupuncture since spring after my surgery where a golf-ball fibroid was removed from my uterus. She is always telling me what I need to do better: eat more room-temperature food, less stress, and the latest one was eat more red foods for my blood.

“Like steak?” I asked.

“Beets, goji berries,” she said.

But it was the week before Christmas and I was a little preoccupied. I forgot all about it. Even though I love beets.

After a wonderful holiday season, this week it’s back to consuming more fruits and vegetables. Beets, too.

As I’m writing this, I’m drinking my beet smoothie. Not quite the same as the recipe in Bon Appetit found here as I adjusted it for ingredients I have on hand (regular milk, agave nectar, blueberries, and I skipped the salt).

It’s a dark afternoon here in Albuquerque, making me feel like I’m back in the Midwest on a January day. My grandmother’s chicken soup (meaning her recipe, of course) is cooking on the stove and it’s sort of that middle of the afternoon blah time. I needed something to take me through to dinner.

For me, smoothies help me get more fruits and vegetables in my daily diet while keeping me full until dinner. And keep me from grabbing chips (oh wait, we ate them all, thank goodness).

It’s the new year, a chance to reset and find energy for the unknown but exciting road ahead.

Tags beets, recipe, bon appetit, reset, reset button, mint, lime, chia seeds
1 Comment

Bizcochitos and New Mexico Tradition

December 15, 2015

You have to use lard if you’re going to make bizcochitos.

I can’t remember the first time I had the traditional New Mexican Christmas cookie but I remember the second year I lived in Albuquerque, when I was having a dinner party, and a friend brought a slew of them that she and her mother made. There are certain things you don’t mess with (like putting colored sprinkles on them) but not using lard changes the flavor. And once a year, why not?

On my birthday Saturday my friend Monica came over to help me make bizcochitos (really, she did most of the work) for a party I’m having this Saturday night.

The recipe we used is from New Mexico Magazine and you can find it here. However, instead of whiskey we used vanilla and don’t tell Monica’s mom but I had bought the Penzey’s ground anise instead of the full seed (which you would crush and then add to the dough) which definitely violates tradition although Monica agreed it gave it a smooth flavor rather than the crushed pieces.

Still, the cookies came out great. One note of caution: add the anise in small doses because not everyone likes that licorice flavor although that’s what makes a bizcochito the traditional cookie that it is.

Tags bizcochitos, New Mexico tradition, New Mexico, cookies, holiday, tradition, anise, lard
Comment

Green Chile Turkey Pie

December 1, 2015

Yes, the leftovers. 

I've had so many emails from various sources like Martha Stewart come across in the past week with ways to use leftovers that I stopped looking at them because I didn't have enough leftovers to make all suggestions. I had two ideas on my mind– the green chile turkey pie and another one to come next week. These recipes aren't supposed to be exactly the same because the beauty of leftovers is using whatever is left and that will be different for each of us. 

When I made my pumpkin pie crust, it created two crusts (using a simple pie crust recipe– it's really not as hard as people make it out to be and I used my fingers to press it in rather than roll it out, like I press the dough with my paper bag pizza). 

For the first layer, I used the stuffing. Then I added a layer of diced turkey which I topped with chopped green chile. However, if you don't have green chile, you can always use salsa here. In New Mexico, we can't go for too many days without craving our green chile and usually Thanksgiving doesn't include it so this is great way to incorporate it back into a meal. And liven up those leftovers.

For the top, like a shepherd's pie, I used the mashed potatoes. Greg had made them and they already included parmesan cheese so I didn't add more. Then I baked it for an hour at 350 degrees.

And if you're already tired of eating leftovers, this is the perfect meal to freeze in pieces for later dinners or easy lunches. 

To come next week: leftover waffles. The waffle iron is on the counter waiting.

Tags Thanksgiving, leftovers, turkey, mashed potatoes, green chile, turkey pie, meal, recipe, pie crust, stuffing
Comment

The Pumpkin Gingersnap Dessert

November 24, 2015

This dessert is based on something I saw in a magazine ad for C&H Sugar. We were having dinner across the street and my inkling was to make the parfaits as suggested but then I decided we hadn't used our trifle bowl yet. I also doubled the amounts from the original recipe although if you like pumpkin, I would suggested doubling it again but not the cream part to let the pumpkin stand out. There is no such thing as too much pumpkin! The gingersnap recipe is the one I used several weeks ago and can be found here.

Happy Thanksgiving, everyone!

Pumpkin Galore Dessert

2 cups heavy cream, chilled

4 Tbsp., plus 2/3 cup sugar, divided

2 tsp. vanilla extract

8 oz. brick cream cheese, room temperature

1 cup pumpkin puree

1 tsp. ground cinnamon

1/2 tsp. ground nutmeg

1/2 tsp. ground ginger

ginger snap cookies

Pour the heavy cream into a cold stainless steel bowl and beat with an electric mixer until it begins to thicken. Slowly add the 4 tsp. of sugar and vanilla extract. Continue beating until cream forms soft peaks. Place in refrigerator.

In another large bowl, beat cream cheese and slowly add the 2/3 cups sugar, mixing until smooth. Add the pumpkin, cinnamon, nutmeg, and ginger, mixing until combined. Fold in 1/3 of the whipped cream into the pumpkin mixture.

Crumble ginger snaps by hand or with a food processor.

Layer in a clear bowl (or trifle bowl), starting with the ginger snaps, then the pumpkin, and finally the whipped cream. Repeat, finishing with a garnish of ginger snaps on top. 

Place in refrigerator for two hours to allow the flavors to blend.

Comment

Hash Brown Waffles

November 17, 2015

There is nothing better than hash browns.

Actually there is: hash browns topped with green chile and cheese. Even better? Mixed into the batter.

I love hash browns but my challenge always has been getting them crispy enough at home (if you live in Albuquerque, Hurricane's makes the crispiest ones I've had here). And I'm not a big fan of the fried smell that lingers in the air long after the meal has been eaten.

There are several tricks that I've learned though:

Soaking the shredded potatoes overnight rids them of some of the starch which also helps make them crispier when they are fried. And using a waffle iron takes care of much of the fried smell (I'm sure you have one at the back of a cabinet that you can dust off).

Hash Brown Waffles (adapted from Mad Genius Tips in the October 2015 issue of Food & Wine)

2 pounds baking potatoes, peeled, shredded, and soaked overnight in water

2 large eggs, lightly beaten

3 Tbsp. all-purpose flour

1 tsp. baking powder

1 cup grated cheese plus more for the topping

3 Tbsp. melted butter

2 cup green chile or salsa

Oil and heat your waffle iron as directed. In a large bowl, mix the potatoes, eggs, flour, baking powder, 1 cup of the cheese (I usually use a mix of sharp cheddar and mozzarella), butter, and 1/2 cup of the green chile or salsa.

Spread a portion of the mixture on the waffle iron, careful that you can still close it. All waffle irons aren't created equal: one way to know when to check the doneness of the waffle is when the sizzling stops. The waffle is done when it's brown and crispy.

Place the waffles in a 200-degree oven while you make more or immediately top with cheese an green chile or salsa (microwave for about 40 seconds to melt the cheese) and enjoy. Repeat making waffles with the remaining mixture. The rest of it can be frozen for future meals so you can return your waffle iron to its place in the back of the cabinet.


Tags waffles, hash browns, green chile, salsa, cheese, New Mexico, Southwestern cooking, recipe
Comment

A Minty Chocolate Cookie

November 10, 2015

These aren't about Girl Scout cookies. Instead, they are about the Frango Mint cookies. If you've ever had a Frango Mint cookie (a staple of Marshall Field's now sold at Macys during the holidays– unless you live in the Chicago area and you can find them at Macys any time), you know what I mean. The Girl Scout cookies don't hold a candle to the Frango cookies. 

Because I was recently cleared to eat chocolate again after suffering years of allergic reactions to it, I've been sampling different types of cookies and such. I found the thin mints are awful. And Oreos aren't any better. Ah, but those Frangos.

While the recipe below doesn't include any Frango chocolate, it's as close as I can get. For now. And Greg will agree, it's pretty good.

Minty Chocolate Cookies

(The wafer cookie recipe is from the Cooking Channel– Homemade Chocolate Wafer Cookies by Zoe Francois)

1 stick unsalted butter, softened

3/4 cup sugar

1/2 cup dark brown sugar, well packed

1 teaspoon vanilla

1 cup all-purpose flour

3/4 Dutch processed cocoa powder

1/2 teaspoon baking soda

1/4 cup milk

Preheat oven to 350 F degrees.

Cream together butter, sugar, brown sugar, and vanilla until light. In a medium bowl, whisk together flour, cocoa powder, and baking soda. Sift the dry ingredients before adding to the creamed butter if there are any lumps.

Add the dry ingredients to the creamed butter mixture and mix just to combine, adding the milk and again mixing just to combine.

Form the dough into two 1 1/2-inch-thick logs, wrap well in plastic wrap, and refrigerate at least an hour. 

Prepare two baking sheets with parchment or other non-stick surface. Slice the log of cookie dough into 1/8-inch-thick coins.

Arrange on the baking sheets with about 1 1/2 inches between the cookies. Bake for 8 minutes and rotate the trays back to front and switch from top and bottom racks (I used the top two racks). Bake for 2 more minutes or until they are dry looking and firm. But don't let them stay in the oven too long because they will burn and you won't be able to tell.

Let cookies cool on a rack and prepare mint dip, this from Martha Stewart.

12 ounces semisweet chocolate, coarsely chopped

1/2 teaspoon peppermint extract

Place the chocolate in a microwave safe dish and microwave until melted, about 2-3 minutes. Add the peppermint extract and stir until the mixture is smooth. 

Line a baking sheet with parchment (I used the sheets I had baked the cookies on) and place each cookie into the melted chocolate and turn to coat. With a fork, lift the cookie from the bowl, let the excess drip off, and transfer to prepared sheet. Refrigerate until chocolate hardens, about 10 minutes.

Makes several dozen cookies.


Tags minty, mint, chocolate, cookies, thin mint, girls scouts, frango, macys, marshall fields, recipe
Comment

Pumpkin This, Pumpkin That, and Pumpkin Cheesecake

November 3, 2015

I have always loved pumpkin bread. I don't understand the recent fascination with pumpkin because it's always been one of my favorite flavors and at my house I keep pumpkin stocked year round (this year I'm stocking up more than usual because we supposedly have a big pumpkin shortage on our hands– I'm not sure I believe it yet because we were told the same thing several years ago and I continued to see pumpkin on the shelves).

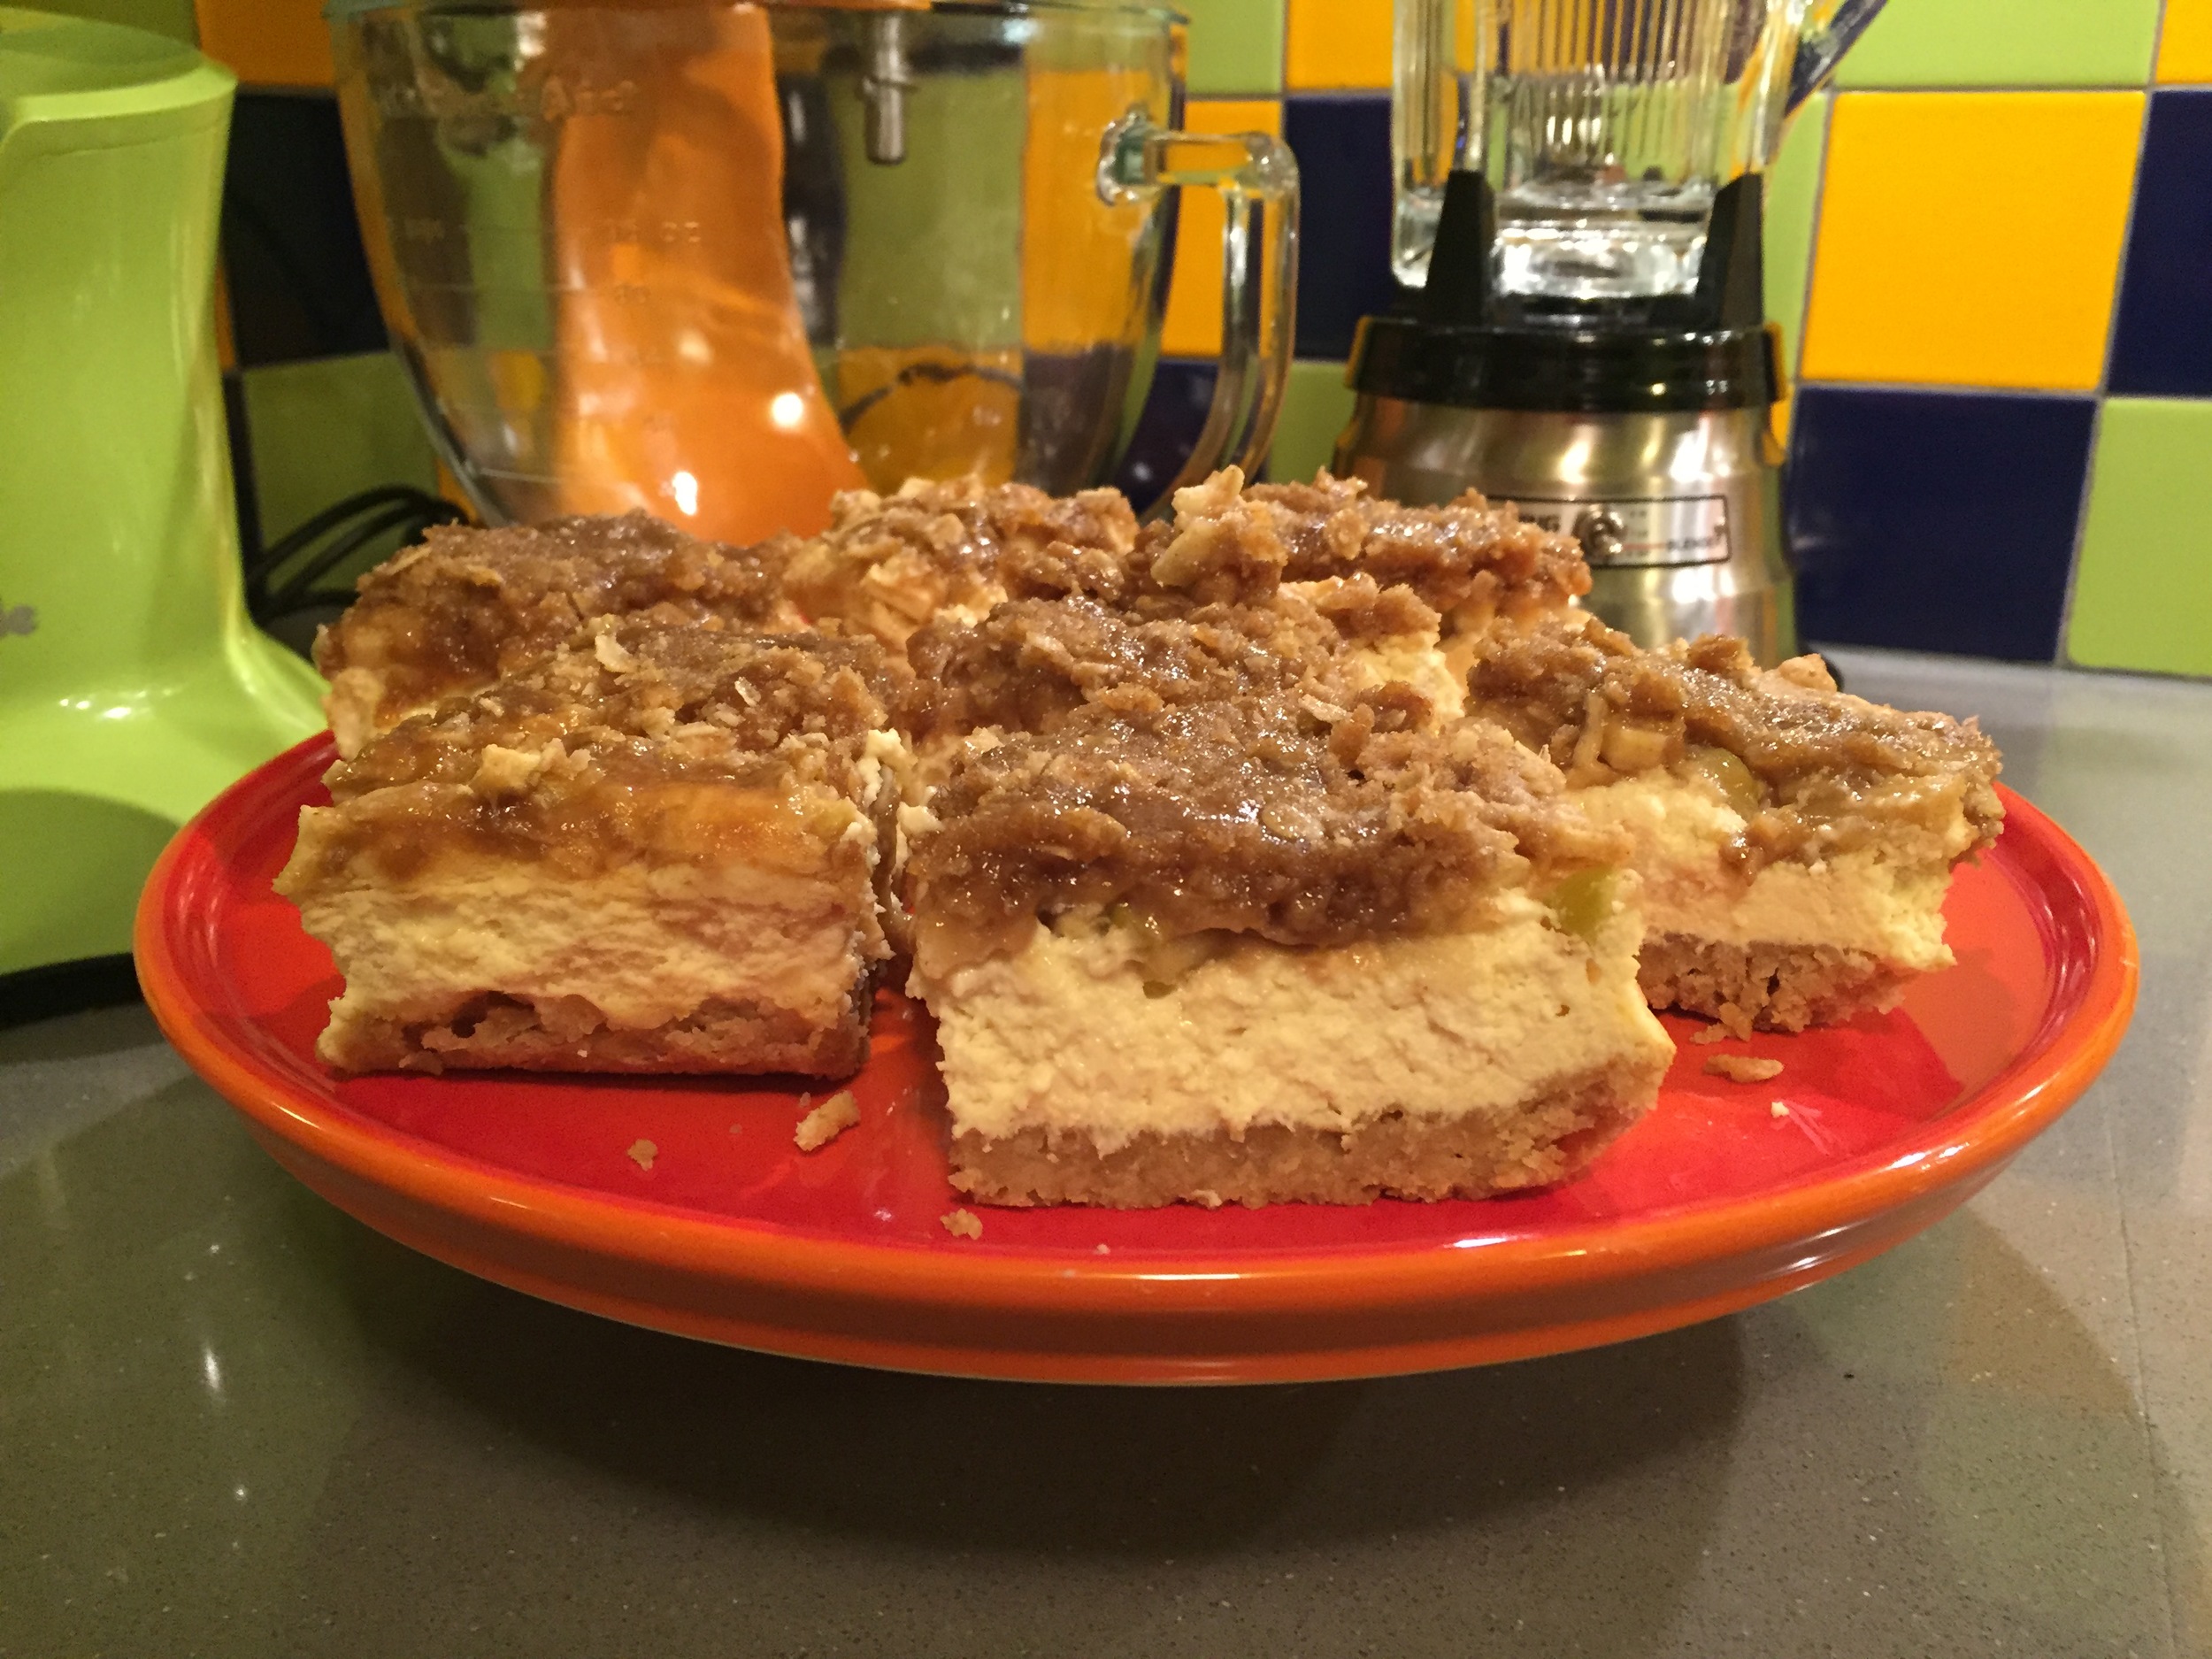
I hadn't made cheesecake in a long time so for our last party I decided to combine two great flavors for a pumpkin cheesecake. However, when I went searching for a recipe, I couldn't find exactly what I was looking for, and I wanted to make my own crust. What you see here is the combination of two Martha Stewart recipes: Pumpkin Cheesecake and Pumpkin Cheesecake Pie with Gingersnap Crust; and one from the Food Network: Incredibly Crisp Gingersnaps (by Nick Malgieri). 

While I love graham crackers, I didn't want to use them as the crust but I also didn't want to make the pie or buy the gingersnaps. It's really not that much extra work to make the gingersnaps yourself– it's mostly planning to make them the day before so you don't have as much work to do at once (plus letting them cool). And because you'll be crumbling them, there is no need to create perfect cookies. I thought about making them as a sheet and baking them that way but simply made odd-shaped cookies instead.

As we transition between Halloween and Thanksgiving, this is a great fall dessert.

Pumpkin Cheese Cake with a Gingersnap Crust

Crust:

2 cups all-purpose flour

2 teaspoons baking soda

1 teaspoon ground cinnamon

2 teaspoons ground ginger

1/2 teaspoon ground cloves

1 1/2 sticks unsalted butter

1 cup sugar

1 large egg

1/4 cup molasses

1/2 cup sugar in small bowl for finishing.

Preheat oven to 350 degrees. Combine flour, baking soda, and spices in a bowl; stir well to mix. Using the paddle attachment on mixer, beat butter and sugar together for about 5 minutes, until very light, fluffy, and whitened. Add the egg and continue beating until smooth. Lower the speed and beat in half the dry ingredients, then the molasses. Be sure to stop the mixer and scrape the bowl to catch any excess dry ingredients. Add the remaining dry ingredients, stir until combined. Roll the dough into balls and then roll in the sugar. Place on a parchment lined or non-stick pan and bake for 15 to 20 minutes. They are ready when the surface is cracked and they are firm to the touch. Let them cool on racks and place in an airtight container overnight.

For the cheesecake:

The gingersnaps above

4 tablespoons unsalted butter, melted

4 8-ounce packages of cream cheese, very soft

1 1/4 cups sugar

3 tablespoons all-purpose flour

1 cup canned pumpkin puree 

2 tablespoons pumpkin-pie spice

1 tablespoon vanilla extract

4 large eggs, room temperature

Preheat oven to 350 degrees with the rack in the center. Pulse the crumbs in a food processor until finely ground. Assemble a 9-inch nonstick springform pan with the raised side of the bottom part facing up.

Mix the cracker crumbs and butter in a medium bowl until moistened; press firmly into the bottom of the pan. Bake until golden in spots, 12 to 15 minutes.

To make the filling: beat cream cheese and sugar on low speed until smooth; mix in flour, careful not to overmix. Add the pumpkin puree, pie spice, and vanilla, mixing until smooth. Add eggs one at a time, mixing until each is incorporated before adding the next.

Place the springform pan on a rimmed baking sheet. Pour the filling into springform, and gently smooth the top. Transfer to the oven and reduce the heat to 300 degrees. Bake for 45 minutes. Turn off the oven and let the cheesecake stay in the oven for another 2 hours. Do not open the oven during that time (I put a note on the oven door)!

Let cool completely after removed from the oven. Cover with plastic wrap and refrigerate until firm, at least 4 hours and unmold before serving.


Tags pumpkin, cheesecake, fall flavors, recipe, martha stewart, baking
Comment

The Complexity of Recipe Writing

October 27, 2015

A number of years ago I worked on a fundraiser cookbook for a national grief organization. My job was to edit a slew of recipes but my own recipe– my mom's danish puff– was edited and I can still remember when the main editor came back to me and said I needed specific amounts for the icing, a powdered sugar and milk combination.

"You have to remember not everyone is comfortable cooking," I can still remember she wrote.

That was a good lesson for today when I am writing and rewriting recipes. Right now I'm sitting on a number of them that I haven't posted because I have go back and check the amounts. Or many times I have used a recipe I've found online but I made changes to it and I can't post it until I spend a little time getting the ingredients and their amounts right. Then there are the times I combine several recipes (like the recent pumpkin cheesecake) and I need to put them all together. 

I rely on Martha Stewart recipes quite a bit because they are usually well written and tested well. I often find that other recipes (Emeril is one example) don't have the quality behind them and they don't work as well. I also recently had a problem with chocolate-covered Katie: while I had tried some of hers in the past, the pumpkin bread both times wouldn't bake. I realized the problem might be that she doesn't live at altitude and when I questioned her about it via Facebook, of course she had no idea about high altitude baking.

While altitude doesn't affect everything, I am always aware when I bake that whatever I'm making might not work out because I live at 5,000 feet. And then she didn't offer to have anything tested. While that cookbook is on my counter right now, it's going to find its way back up to the top shelf of cookbooks soon.

But Martha also disappointed me recently. When I used one of her recipes to make the chocolate cake in the LeCreuset dutch oven (and this is the reason I haven't posted the recipe yet– because I have to do redo it), the ingredients are all out of order. And in the age of anyone posting anything they want on the internet, there is more and more of this. Having everything in order on the list ensures we won't forget something. That's how the sugar got left out the first time (although I added it in before it went to the oven and it worked out okay). However, that can be enough to ruin a recipe and the item created from it.

It's taking me a while to get the recipes online but it's because I'm trying to make sure they are in the best place they can be: edited, tested, and retested. In the long run, you'll thank me.


Tags cooking, recipe, recipes, recipe testing, creating
Comment

Chicken Tamale Casserole

October 20, 2015

The first time that Greg cooked for me, this is what he made: the chicken tamale casserole. While the recipe is easy so it should be a cinch for any bachelor to make, it's a tasty meal that can come together quickly on a school night (or any other night where cooking feels like the last thing we want to do). And there might be enough for leftovers for lunch for the next day. Besides, it includes Fritos and who doesn't like Fritos?

Chicken Tamale Casserole

8 oz. bag of Fritos

1 rotisserie chicken 

8 oz. of roasted green chile, chopped

1 large can of sweet corn

1 large can of black olives, chopped

2 large cans of tomato sauce (16 oz. each- or the 2-pound can)

1 pound cheddar cheese shredded (or other good melting cheese like colby)

Garlic powder

Layer ingredients from the bottom to the top in two deep casserole dishes (or one large rectangular baking dish):

Start with a thin layer of tomato sauce then add the Fritos to cover the bottom 1 inch. Top that with the rotisserie chicken meat, 1/2 of corn, 1/3 olive, 1/2 green chile, and the rest of the can of tomato sauce. Sprinkle with garlic powder as desired. Then add enough cheese to cover the dish, garnish with remaining olives.

Heat in oven at 390 degrees (yes, you read that right) for 25 minutes or until it bubbles.


Tags green chile, tamale pie, chicken, New Mexico, Southwestern cooking, corn, recipe
Comment

The Italian Beef Sandwich

October 13, 2015

Recently, I posted on Facebook how my dad had worked at Continental Can Company and I surprised to find– within a few hours– that several of my high school classmates had dads who also worked there. All my life I thought my dad was the only one, especially because most dads commuted via the train to downtown Chicago. While Dad had started his career at the Chicago plant on the south side of the city, he moved to one near our home at some point and drove there each day.

And growing up, I also thought that my family was the only one that Italian beef sandwiches. I know all my Chicago friends are laughing but these were the days when there were just a few Portillo's locations (I think just the one Mom would take us to about once a year- on Butterfield in Downers Grove). When we had a family gathering for a birthday, a first communion, a graduation, or Christmas, my dad drove to Addison and came home with a big container of Italian beef. Saturday morning he would come home from Dominick's with several long loaves of French bread. And sometimes he did this on a Saturday night just because it was one of his favorite meals.

And yet I didn't know anyone else who ate Italian beef even though we sometimes would stop at Bonos– a few miles away– for sandwiches instead of making them at home. 

As Portillo's grew, so did the availability of Italian beef. At the end of my dad's life, no long did he have to drive to Addison for the big tubs of it (I'm not even sure why he went there). And because we could get the sandwiches dipped in the juice, no longer were we chastised by him for not spooning it on rather than dipping our bread in the juice (which drove him nuts, but I continued to do it, urged on by Mom who didn't think there was another way to get the bread as sopping wet).

A week ago, I flew home with several tubs of gravy and vacuumed packed packages of meat for a party at my house this past weekend. I had done this once a long time ago– introducing my New Mexican friends to the Italian beef sandwich– but my life has changed and it was time to do it again for all the new people in my life.

I added potato salad, as my parents would have done, and set to showing everyone how to make the sandwiches, complete with dipping the bread in the juice. The only thing missing? Mom's jello mold.


Tags portillos, italian beef, sandwiches, memories, food, meals
Comment

The Prickly Pear Syrup

October 6, 2015

This weekend I was hosting a party for my latest book (Flowers by Day, Stars by Night: Finding Happiness after Loss and Change) at the home of friends in my hometown. I thought it was a good opportunity to share some New Mexico so I brought along the last bag of frozen prickly pear puree from last year's harvest.

However, the morning of the party, I realized that I needed to turn it into syrup. And then I realized I didn't have the recipe. No problem, I thought, pulling up this web site only to realize that while I had promised to put the syrup recipe here, I never did. And obviously no one is reading the blog because no one noticed!

Thankfully, I texted Greg and he took a photo of the main recipe I use from The Prickly Pear Coobkook by Carolyn Niethammer and I set to work.

I generally double the recipe for the syrup because I'm usually serving it for a party. And I let it sit on the stove, under a cold burner, after it's done cooking, to give it more flavor.

The syrup is great for punch (as I've written about before) and can be mixed with a seltzer for a fizzy drink.

Prickly Bear Syrup

1 cup prickly pear puree

1 lemon, juiced

1  1/2 sugar

Combine all ingredients and stir until the sugar has dissolved. Slowly bring to a simmer and cook for about 15 minutes, until the syrup begins to thicker. Let cool.

Tags prickly pear, cactus, syrup, cooking, recipe, southwest, southwestern cooking, New Mexico, cacti
Comment

Chilaquilies

September 29, 2015

Chilaquiles.

Really, what could be better than eggs, cheese, tortillas, and red chile?

There are a variety of ways to make this recipe– you can use corn tortillas instead of chips (we had a bag of chips so I used them) and you can use green chile instead of red chile. Or if you don't have chile options, salsa would work great. I used queso fresco– the mild Mexican cheese– but you could use any other cheese that melts well. Finally, you can add chicken or other meats. The options are endless!

Take my basic recipe below and mix it up. You'll find you have an easy dinner for a crowd or on a night when you need something you don't have to think much about throwing together. 

Easy Chilaquiles

12 eggs, scrambled

1 bag tortilla chips

1 pound queso fresco

16 ounces chile sauce or salsa

In a 9x13 baking dish, place the tortilla chips on the bottom. Then spread the scrambled eggs on top of them and do the same with the chile sauce. Finally, evenly crumble the queso fresco. Place in the oven at 350 degrees for about twenty minutes, or until the cheese has melted.

Tags chilaquiles, red chile, recipe, Mexican food, eggs, queso fresco, tortilla chips, Southwestern cooking, New Mexico
Comment

The Green Chile Enchilada Casserole

September 22, 2015

I love enchiladas, but when I'm feeding a big crowd or need something easy one night, the enchilada casserole is one of my go-to meals. It also works well frozen in smaller portions for later meals. And I have cut down on the fat by not frying the tortillas and by using a lower fat cheese.

The recipe:

Green chile sauce (see the recipe I made several weeks ago)

12 corn tortillas (I used 9 the last time I made the casserole)

1 onion chopped into small pieces

1 pound of cheese (I've been using mozzarella because it has lower, fat but you also can use anything that melts well– my favorite is colby longhorn)

tomato and lettuce for garnish

I tend to like my enchiladas piled higher so I'll use a 9 x 13 pyrex (although in the photo I used the new Le Creuset dish we received as a wedding gift and holds heat very well), however, you can use any size.

Spray the bottom lightly with oil and then place a layer of corn tortillas on the bottom. They don't need to overlap much, but you might need to tear some in half to make it work. 

Spoon on the green chile sauce and then sprinkle both the cheese and onion on top, making sure you have spread all three items evenly.

Repeat. I usually have two to three layers, but the key is to stop when you have run out of one of the ingredients.

Bake at 350 for about 30 minutes. You are looking to make sure it's heated through and the cheese is melted. Garnish with lettuce and tomato, if desired. Serves 6-8.

Tags green chile, enchiladas, enchilada casserole, new mexico, cooking, new mexico cooking, southwestern cooking, recipe
Comment

A warm green chile salsa

September 14, 2015

There are many ways to make salsas and sauces, green chile style. And if you're not an adventurous cook, remember that you can't go wrong. Well, you can if you add too many jalapeños! After all, you don't want it so hot that you can't enjoy it.

I saw the original version of this sauce on an episode of "Throwdown with Bobby Flay" where he took on a mom and her son in Tucson. I've made the sauce several times since, realizing each time it does come out a bit differently based on the taste and heat of the vegetables. 

I freeze this sauce in smaller portions and take it out periodically to use on top of eggs, as an enchilada sauce, in a cup of beans, or yesterday- drizzled on top of a pork spinach loaf. It gave the loaf an extra zing. Finally, this batch I made on Sunday used leftover tomatoes from the garden  and jalapeños. We all know how sometimes we end up with a too many garden pickings and this is a good way to enjoy them.

Tomatoes (three or four large, more if smaller)

3 jalapeños (again, depending on size– I used quite a few in the batch in the photo)

4 garlic cloves peeled

4 fresh green chilies (not roasted)

vegetable oil

1 onion, chopped into small pieces

4 more garlic cloves, peeled and chopped

Salt, as needed

Place the tomatoes, jalapeños, first round of garlic cloves, and green chilies a large dutch oven filled with water. Bring the pot to a boil and let it simmer, covered, for an hour.

Using a heat resistant blender jar (like a Ninja which is more accommodating to hot ingredients), puree the entire contents from the pot. You may need to do this two separate times to include it all. Use a heat resistant bowl to hold the sauce if you need to do it in two separate servings.

While the sauce is in the blender, sauté the onion and garlic in the same dutch oven. When the onions glisten, add the puree back to the pot and bring to a boil. Add salt as needed and let it simmer for about 30 minutes.

Serve hot or cold.


Tags green chile, tomatoes, onions, recipe, chile, sauce, enchilada sauce, southwest, southwestern cooking, New Mexico, cooking
Comment
← Newer Posts Older Posts →

Recent Posts

Food & Wisdom
Roasted Tomatoes and Basil
about 2 weeks ago
Lemon Shrimp and Rice
about a month ago
Pineapple Upside-Down Cake
about 2 months ago

chelle_summer.jpg

Michelle's other website -  Chelle Summer - is filled with writings of hope and encouragement while to helping others find their way with love and compassion.