
Letting Others Cook for Us
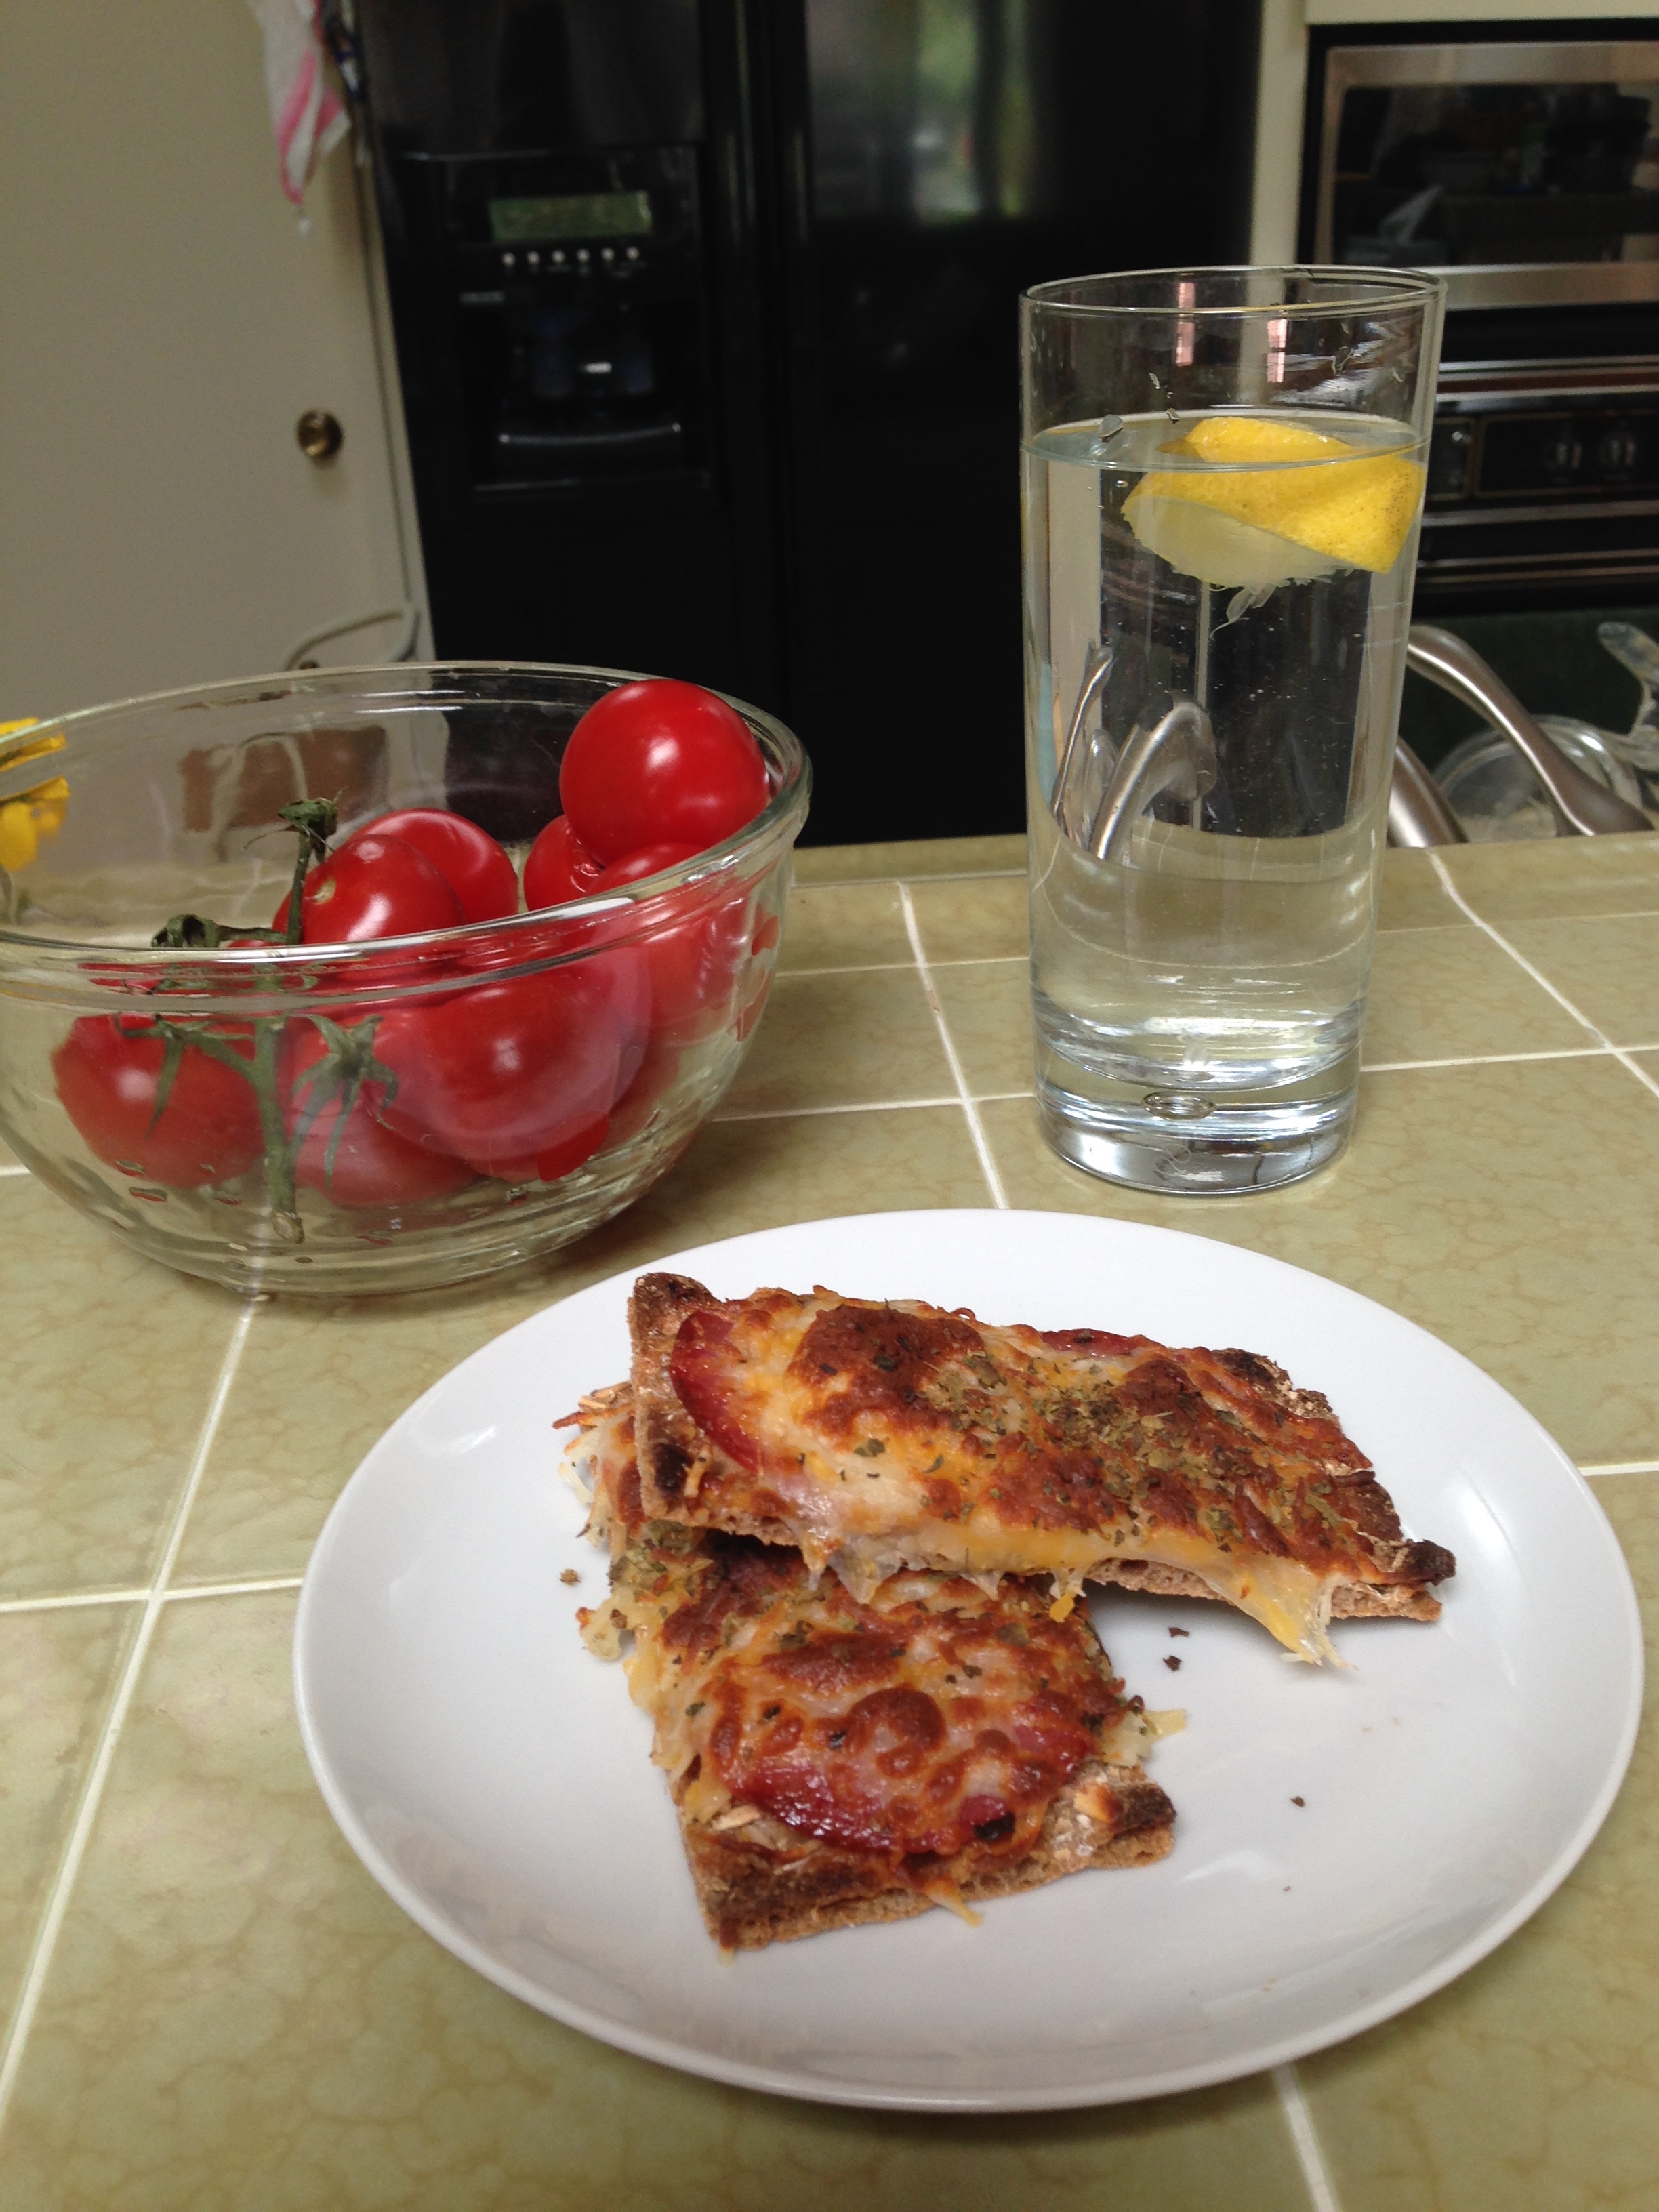
This might not be the most exciting photo ever but the meal on the plate signifies something really important to me: allowing my fiancé to cook for me.
I obviously write a lot about how I cook for others but I often forget how gratifying it is to have someone cook for me– and what it means to that person. I am the one who plans most dinners at my house but in the last year and a half since Greg and I have been together, I'm getting better about giving him opportunities to cook for me.
While he was clear with me from the beginning that he wanted to cook for me sometimes, it's become a necessity on certain days when I have had work to do and if we wait until I'm done for me to start cooking, we'll be eating really late.
We're in Southern California this week staying with friends of mine and while I was in the shower yesterday Greg made these cheese toasts for me. They are easy to make and something his dad made for him and his siblings growing up.
At our house he takes Wasa crackers (which I have liked since high school and are inexpensive) and tops them with cheese, oregano, and anything that is available (yesterday it was salami and tomato), and sticks them in the oven to melt the cheese.
They are not just an easy snack but can be an easy lunch like they were yesterday. And Greg gets to enjoy cooking for me while I get introduced to other flavors– and the happiness of getting to relax and savor what he creates for me.
The Joy of Entertaining

My parents didn't entertain much when I was growing up. Generally any gatherings of people were centered around family events: baptisms, first communions, Christmas, Easter, graduations, and my grandparents' birthdays. But since I was near the end of in the birth order of both sides, by the time I was growing up, much of this had occurred (outside of the yearly events).
Nor did I grow up in a family where friends came over frequently for dinners or just to gather. While I realize now how good my mom was at planning for multiple people to sit at her dining room table (that easily sat 12), most of what I learned about entertaining came from trial and error.
I still remember one of the first times I hosted a meal as a newly married person and I asked a friend if she thought it was acceptable if I used placemats instead of a tablecloth. I really didn't know the answer (and I know now it doesn't matter).
I also now know that it's more than serving a group of people a meal and worrying about how good the table looks: it's about the time we spend with people. There is a satisfaction in feeding people but mostly when I look back at the times I've hosted meals or been to the homes of others, it's about the laughter, the conversations, the stories we share.
It's about the spots in the tablecloth that people apologize for when they spill something but I wave off because I know that those spots will tell the future stories each time I pull that tablecloth out.
I don't worry about setting a table when I'm preparing for a gathering. Instead I focus my energy into hoping that we enjoy our time around the table. And that we want to do it again.
Recreating the Tagalong Cookie

I'll be the first to admit that I'm all for supporting Girl Scouts. I was one and I loved selling the cookies although my dad never took the order form to work so I never sold as many as other girls I knew. And there were so many of us in the neighborhood it was hard for all of us to get a lot of orders that way either.
Recently, I was cleared of my chocolate allergy and asked my fiancé to bring home a box of Tagalongs from someone who was selling them at work. I was so excited...until I tasted them.
If you love the cookies, that's great. But I realize now I'm not a big chocolate fan and that has a lot to do with my disappointment so I set out to make my own. The recipe I followed is here.
The recipe wasn't bad but I did make a few changes: I used the semi-sweet baker's chocolate and we, er my fiancé, rolled out the dough for me and we went a little thinner than the suggested half inch. This meant we needed more chocolate and we actually didn't dip a few, enjoying the peanut butter on top of the shortbread. I also would rather try them with carob but carob is hard to melt for dipping.
No matter, for me I like knowing I can control what goes into the cookies so I can avoid that long list of ingredients I can't pronounce. And knowing I can put in all the peanut butter I want.

Eating Gluten Free: The Red Chile Enchilada Casserole

I don't necessarily have to eat gluten free. I'm not allergic to gluten, however, what I like about this recipe is that it has high in protein: chicken, black beans, and the quinoa add a good bit of protein and the red chile is filled with Vitamin C. I also didn't have red quinoa and used the tricolor from Trader Joe's instead.
The recipe comes from The Albuquerque Journal newspaper and is copied below. I used this recipe from Bueno Foods to make the red chile sauce. I have a number of pods and it was a good way to start using them up
And this is the kind of casserole you can cut up and put in the freezer in small bags to reach for quickly later or for lunches.
Black bean chicken and quinoa enchilada casserole
1 cup of red quinoa
2 cups low- or no-sodium-added chicken stock
1 small yellow onion, diced
2 cloves garlic
1 tablespoon olive oil
1 15-ounce can low-sodium black beans, drained and rinsed
2 cups diced cooked chicken breast
2 cups red chile sauce
1 cup shredded cheddar cheese
Rinse the quinoa. Use a rice cooker or the stovetop, preparing the quinoa as you would rice. Add the chicken stock and quinoa to a pot, bring to a boil, lower to a gentle simmer and cover with a lid for about 20 minutes until all the liquid is absorbed.
In a large skillet, sauté the onions in the olive oil until translucent then add garlic. Sauté for another minute and add quinoa, beans and chicken. Stir until well blended.
In a 9×13-inch casserole dish add a small amount of the red chile to the bottom of the dish then spoon the quinoa mixture into the dish and top with the rest of the red chile and then sprinkle the shredded cheese over that. Bake in oven at 375 degrees about 15 minutes until the cheese is bubbly and lightly browned.
My Funky Kitchen

Everyone thought I was a little off when I said I was going to paint my new kitchen lime green. But just like everyone thought my yard was too small for a large pool, I knew what I was doing.
And when my kitchen won a Moen Faucet design contest, it was further proof I knew what I was doing. Somewhere I have photos of the original kitchen from when we bought the house in 2001: the brown appliances and orange and yellow linoleum that the tile guy scraped out. We initially replaced the appliances (of which the stove only still exists and will only go away if dies) and put down a gray tile floor, the rest had to wait because of finances.
The kitchen wasn't supposed to part of the major remodel undertaken in 2005 but as I looked at the new addition to the house and the dining room that then would have a bigger opening to the kitchen, I looked at my then husband and said there was no way we couldn't do the kitchen, too.
While my only beef with my kitchen is that it's not bigger (and I remind myself of the small kitchen my grandmother cooked in), I am incredibly happy even ten years later. I know a lot of people choose a brown scheme or choose a Tuscan theme but I wanted something that reflected me. I also didn't see myself with a Southwestern theme so much as I wanted it to be a combination of Southwestern and new retro. I found it in the bright tiles that pop against the gray counters, gray tile floor, and the white cabinets.
The best part of all is that it's a happy place to cook and create, one where I feel like I'm in my element. It's part of me.

No Knead Bread That Rocks...in the Dutch Oven No less
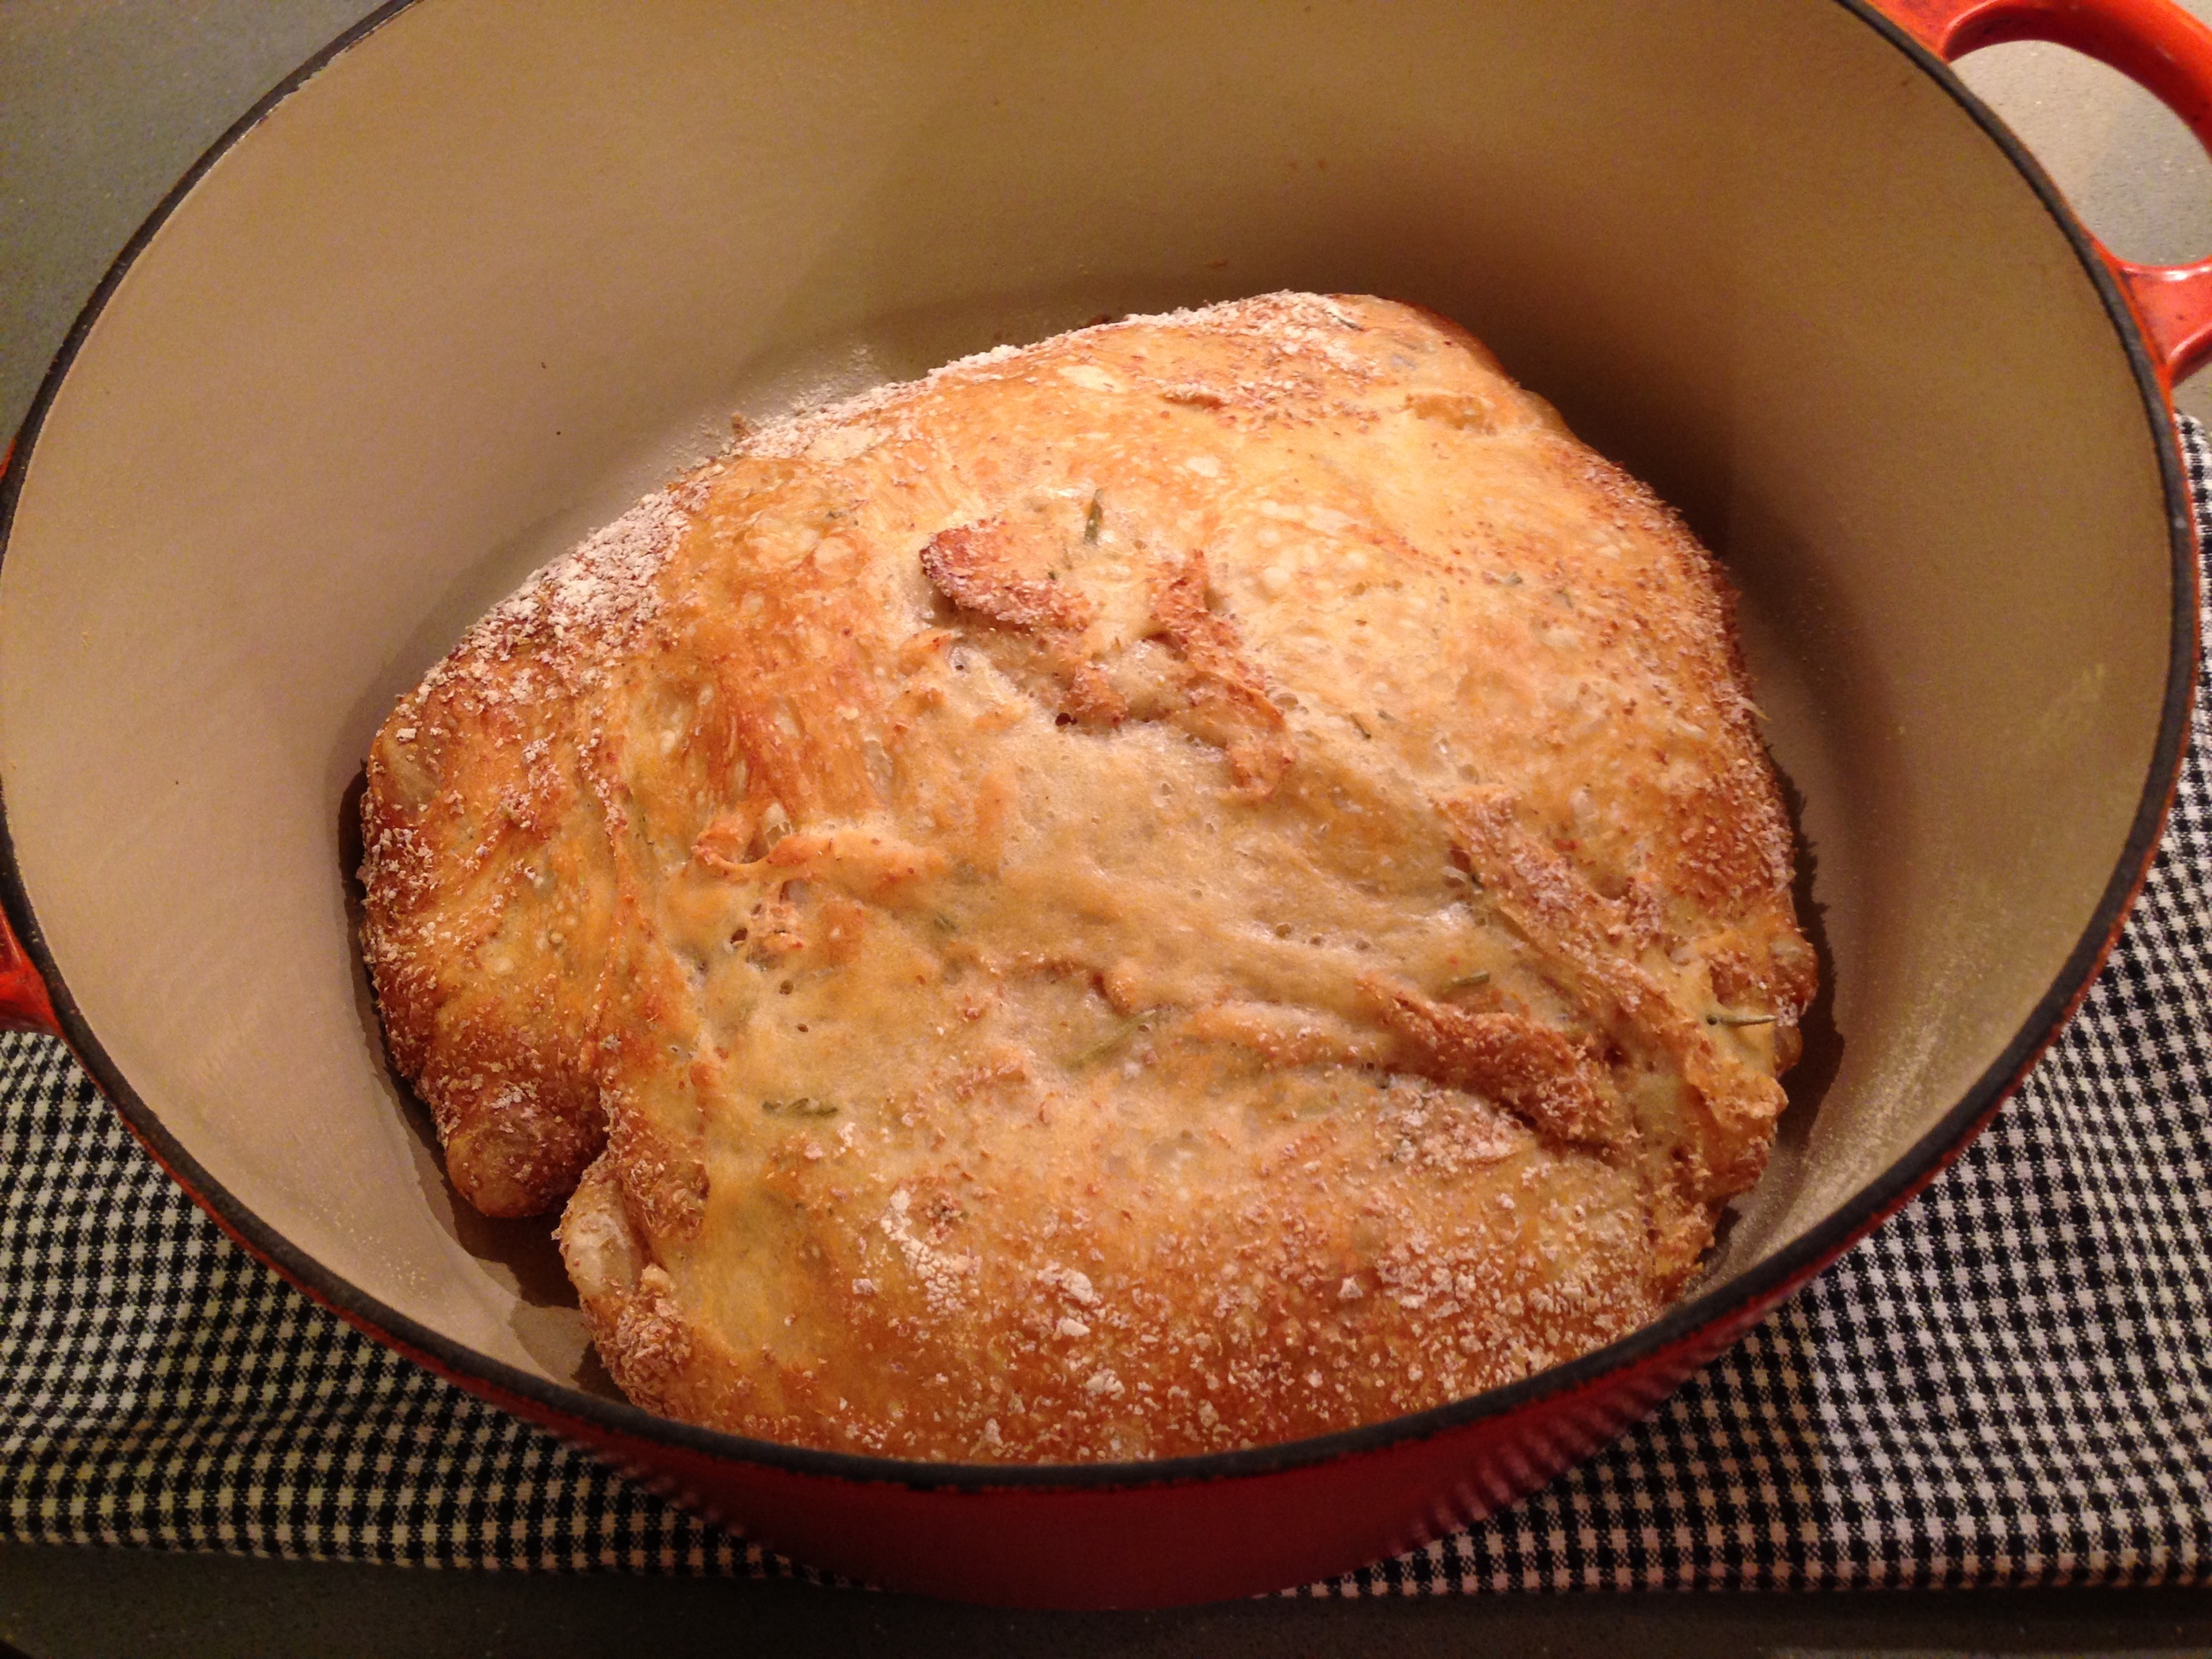
I will be the first to admit that I never make bread because I'm not really into kneading it. My pizza dough involves no kneading so it's not something I've ever really done before. But it actually wasn't the no knead that attracted me to this recipe, instead it was the fact that's its made a dutch oven and I'm all about preparing as many food items as I can in my Le Creuset dutch oven.
The key is that you have to do some planning because the dough takes two days to make. It's not like you can wake up that morning and say, "Hey, we'll have bread tonight." You need to wake up the morning before you want bread and say, "Hey, we'll have bread tomorrow night."
I made the bread with both the wheat germ and the corn meal and I preferred the wheat germ. It also gives the bread more nutritional value since it uses bread flour. The second time I made the bread I added rosemary for flavor
Give it a try. It's some of the best bread you'll ever have.
Find the recipe here.
Gluten-Free Brownies That Rock

I didn't think they'd be that good.
I had made a mess of my kitchen: bowls everywhere, brown rice flour on the floor (that Nestle, the yellow lab, didn't think was good enough to lick up) because the package leaked, and melted chocolate in spots all over the counter. I was beginning to wonder if it was worth it.
I thought it was worth a shot to try the recipe for gluten-free brownies in the Martha Stewart Clean Slate Cookbook but I have this habit of not looking closely enough at the recipe and I'm usually missing something.
Yeah, more than one thing this time. I only had half the chocolate for one. Even though it had to be melted, I added carob, while I also realized that carob does not melt well. And then there was the almond flour. I may be all for different types of flour but almond flour is one of the most expensive and that I'm not for.
I knew I had some garbanzo bean flour and while I was looking for it I found brown rice flour. And when I read on the back of one of the packages of the two being used together, I thought it might be better in case one didn't work as well. Instead of the 2/3 cup of almond flour I went with a 1/3 cup each of garbanzo bean flour and brown rice flour.
By the time they went in the oven, I thought they weren't bad but when I pulled them out and tried them I worried they were a little...tasteless.
While I don't like a lot of really sweet foods, especially because I've gotten used to more natural and less processed food, I wasn't sure these were even good enough for that. I cut the brownies, left them on the counter, and went for a walk with two friends.
When we walked in the door, I started to say to Greg that I wasn't sure if the brownies were good enough until I realized he had a piece in his hand and he said, "I can't stop eating them."
Here's the link to the original recipe and my version is below:
1/3 cup extra-virgin olive oil
8 ounces dark chocolate (at least 70% cacao- do not use 100% cacao as you will end up throwing out the brownies!!! The Target Simply Balanced brand is 70% and works very well), chopped
1/3 cup light brown sugar
1/3 cup pure maple syrup
2 large eggs
2 tablespoons carob powder
1/2 teaspoon baking soda
1/3 cup brown rice flour
1/3 cup garbanzo bean flour
1/2 cup chopped walnuts
Preheat oven to 350 degrees. Spray 8-inch square baking pan with oil.
Melt half of the chocolate in an heatproof bowl; whisk in oil, sugar, and syrup. Remove from heat. Whisk in eggs, one at a time, then cocoa and baking soda. Fold in flour and remaining chocolate plus walnuts. Pour batter into prepared pan and cook until an inserted toothpick comes out clean, about 30 minutes. Let cool completely before cutting.
Finding Inspiration in Cooking

Recently, I have been struggling with lunch. My days are packed– even more so right now between work and planning for a June wedding– and I have so many phone calls that I don't have time to think about what I'm going to have for lunch.
Finally today I decided to pick up some frozen meals just so I didn't have to think about it for a week. I was at Target and looked for a few of the Amy's brand Mexican casseroles. I like them but as someone whose body can't handle a lot of salt, the sodium content is much too high for me. However, today I found them with half the sodium. But then I looked to the right of the Amy's section and saw the evol (with the backward e) meals including gluten free burritos (which Greg's says should not be called burritos at that point). And then I spotted a fire-grilled steak bowl with black beans. I need meals high in protein, low in carb. It took me a long time to figure out how I function best; there is no pizza for lunch in my world or I'll be asleep all afternoon.
As I continued to walk through the frozen food aisle, I realized I was getting ideas: inspiration. While sometimes recipes are good inspiration, trying a combination someone else has made can work better. The fire-grilled steak bowl wasn't bad but a little tasteless for me. That means next Friday I'll be picking up the ingredients to make my own. Look forward to the recipe here soon.
The key for me is having enough meals in the refrigerator (because I work at home) that I don't have to think hard about lunch. And with today's inspiration, I think I'm good for awhile. All it took was a little time to let my mind wander at the store.
Adventures in Cooking and in Life: Avochocopudding

A few weeks ago when the priest came to dinner, I served my signature carob peanut butter cookies for dessert. After Greg announced that I also make chocolate pudding with avocados, Father turned to me and said, "You're quite adventurous with your cooking."
I never thought of that way but since then I've been reflecting on why I am constantly tearing out recipes from magazines (I always pass the magazines along to people but warn them that some pages are missing) and that a chest of drawers my grandfather made by the front door my house is filled with an unorganized mess of recipes (the most unorganized part of my house).
Cooking is a release for me and as a creative person, I am always looking for new ways to do things, new foods to try, new ways to make foods healthier but still good. I'm the same way in my life: while I admit I like to have the opportunity to jet off to various places, that doesn't always happen and when I'm home I need to find ways to make the day meaningful to me. I do that by creating.
The recipe below is originally from the Martha Stewart Clean Slate cookbook. I have altered it by using carob instead of chocolate. While I was recently cleared of my chocolate allergy, I'm finding that after not eating chocolate for so long, I must prefer the taste of carob. You can substitute cocoa powder for the carob but I dare you to use carob powder. You'll be surprised by the taste– and there are health benefits behind carob (digestion is one) as well. I also don't like honey and substituted maple syrup instead.
It might sound weird, to use an avocado, but what we're doing is giving the pudding its texture by including ingredients that are healthier. I only advocate that you don't let it sit for more than a few days in the refrigerator as the carob taste seems to melt away and you're left with, well, avocado.
3 avocados (halved, pitted, and peeled)
at least 1/4 cup carob powder
1/4 cup maple syrup
1 teaspoon vanilla extract
Puree all ingredients in a food processor or blender until smooth.
Coping and Eating

I started to read a novel once about a woman whose husband died and how she ate a lot of ice cream. While it is easy in the face of loss to not take care of ourselves, this is the time when we need to somehow find the energy to do just that. No matter if a loved one has died or we are coping with the end of a relationship, we must take care of ourselves.
Grief is not just emotional, it's also physical. It takes a toll on our bodies as much as it does our emotions (and our spirituality). It uses a lot of energy to cope with the loss, to get used to a new life. We find we are tired a lot of the time and we lack the energy to do things like grocery shop or make meals.
It's going to take a little more work but the benefit in the later will far outweigh the energy you have to push yourself to put into making better meals. As I continue to write this blog, look forward to recipes that will help you keep your energy at a peak level so you can grief the loss while still being present in your life.
And all those people who have asked you how they can help? Ask them to help you eat healthy: to bring over healthy foods, to give you a hand in making healthy meals. You're giving them an opportunity to help you while they also will be helping themselves.
Don't succumb to the half gallon cartons of ice cream. They are a good treat but not something for dinner every night. You owe it to yourself to go forward (which doesn't mean you forget who or what you have lost). Life is about being present now and the more you do that, the more peace you will find.
I have been using this recipe from Martha Stewart for an afternoon smoothie. I make it with cherries instead of mixed berries and sometimes I'll add unflavored protein powder. For me, afternoon snacking is a challenge and having something that fills me up and gives me more energy is just what I need. Don't freak out that it's tofu! It has no flavor which makes it a great protein source when mixed with other ingredients. Check out the recipe here.
Finding Taste in Healthy Eating

There is nothing worse than bland food. And not just bland food but waking up in the morning, wanting to eat better and feel better, but knowing that, well there isn't much to look forward to food wise in the day.
While none of our lives should revolve around food, there is some truth to the satisfaction we feel in a good meal. After all, our bodies need to be nourished. It's part of the emotional-spiritual-physical pie of life.
I remember back in the seventies and eighties how challenging diets were because the knowledge people had about how to use spices was minimal. And ice berg lettuce isn't exactly nutrient rich although it is filled with water. That satisfaction doesn't last long though.
My father ate a very bland diet but my mom always had the bottle of crushed red pepper near her. I often hear how children don't like spicy foods but somehow that crushed red pepper always made it onto my slice of pizza and I got used to the flavor.
In my own quest to eat well, I have finally figured out that it helps to food to look forward to. And that means food with taste. I feel fortunate to live in New Mexico. I see now how coming here in 1994, when I was 22 for graduate school, has been a huge influence on my cooking. I didn't realize how much until I moved away and came back.
I have learned how to use chiles to make food desirable even with less fat. Look forward to more blogs and recipes that use spices, not hot ones, but just enough to give it flavor to make it a meal you'll feel satisfied and ready to continue to create the life you've always wanted by feeling good and looking good.
Check out the black bean soup I use here– from Martha Stewart. I don't use my regular blender to mix the hot beans anymore after the lid was too hot and popped out of my hand that one time. It's not so much fun to clean a black-bean splattered kitchen! I have Ninja blender that works great for hot foods. It also doesn't matter what kind of chiles you use– whatever you can find in the store. I do love sliced avocado on top of my soup though. With some chips it makes a great lunch or meal on a cold day.
Tofu Scramble and Setting up the New Year

I am not a huge fan of new year's resolutions. As someone who has been running for a long time, I see the number of people out running increase after January 1 and then fall off after people get bored or tired or both. I do think it's good to set goals and for me January is the usual time I set goals because my birthday is in December: I'm coming into a new individual year and an overall new year. But I do then at any point during the year when I feel the need to make a change or move my life forward because it doesn't matter when you set your goals, the key is sticking them.
And I believe one of the hardest parts about setting goals regarding eating is finding healthy food that tastes good. I've been trying to eat well since I was in junior high– this was the middle 1980s and we didn't have the access to the food we do now. We also didn't have the knowledge. For instance, everything would say that you need to eat salad. That was great and I was happy to do that but no one told me to add some protein to my salad (in those days "salad" meant all vegetables) so I wouldn't have a headache at the end of the school day when I went out for track practice.
After a few days of that, there was no more healthy eating; I needed protein I wasn't getting. Today I would add hard-boiled eggs and nuts.
But I also didn't understand why I would attend a conference and want to sleep during the keynote: orange juice and bagels are not exactly the best breakfast to keep people awake (but they are cheap!). I finally started bringing my own blender and making smoothies. It wasn't worth the exhaustion I felt when I didn't get a good breakfast.
Now we talk more about eating proteins that will fill us up and keep us full for a number of hours. We have access to whole grains rather than simple carbohydrates. And we are encouraged to eat more greens.
There are lots of good happenings in the eating world but I'm sure many people don't think that tofu is one of them. I would agree– the one time I made tofu I didn't get it. The white substance had no flavor and left me hungry.
I decided to give tofu a chance again with this recipe from the Martha Stewart Clean Slate Cookbook (one of several that I've tried already). I made it Saturday for lunch and while I did things slightly differently: used chile powder instead of turmeric, no cojita cheese, and onions instead of scallions, it was quite tasty. I liked the spice off the chiles and the chile powder. The tofu wasn't too bad either because it had been blended with several other spices. We also had strawberries as a side.
However, I was hungry about two hours later. In the future I would find something to pair it with to help stave off my hungry and I would add more black beans. While I agree it is important to eat every few hours, often our lifestyles don't allow us to do that. The less I think about food, the better off I am.
Give tofu a chance in the new year.
The tofu scramble recipe is here.
The New Year and Ice Cream Cake

The New Year and Ice Cream Cake
With the New Year upon us tomorrow, I will admit I fully enjoyed all the treats from this holiday season, and recapping the memories many of them have for me. However, starting next week I’ll be venturing back to healthier eating although that doesn’t mean there won’t be desserts! I am working on recipes that lighten up what’s already good: my goal is not to lose taste and flavor while educing fat and calories.
But for New Year’s I’m finishing off 2014 and starting 2015 with my Grandma Zurawski’s Ice Cream Cake. I don’t recall my mom ever making this but Grandma would when all of us gathered for a birthday, usually my grandfather’s.
About fifteen years ago, I made these at a holiday party I hosted at my house. They were such a hit that a friend who always held a party right after me asked me to bring them to her party– and kept asking each year she held a party thereafter.
Grandma Zurawski’s Ice Cream Cake
2 eggs separated
½ cup sugar
¼ cup milk
2 teaspoons gelatin (plain, usually by Knox and sold with Jell-O)
¼ cup water
9 ounces cream cheese (I use the reduced fat version)
1 teaspoon vanilla
½ pint whipping cream
1 package graham crackers
¼ cup butter
Beat egg yolks with 6 Tablespoons sugar and the milk; then cook over a low flame and stir until thick (coats the back of a spoon). Soften gelatin in cold water and add it to the egg mixture, allowing it to cool. Cream the cream cheese and add the vanilla, then add to the cooled custard. Beat the egg whites and 2 Tablespoons of sugar until stiff. Fold into the custard mixture and then fold the whipped cream into the custard mixture.
Crumble the graham crackers (giving them a whirl in the food processor works well) and melt the butter. Combine them and press on the bottom of a 9 x 12 glass dish, leaving a small portion of crumbs for a light topping. Add the custard and spread evenly over the top, sprinkling the crumbs to finish the cake. Place in refrigerator overnight.
Auntie Virgie's Christmas Cookies
At some point after I moved to New Mexico, when I would fly home for Christmas (usually the week before Christmas) my mom and I would stop off at her sister’s house for lunch. My Auntie Virgie and Uncle Mark lived not far from O’Hare and Mom’s other sister, my Auntie Janice, would come as well.
I loved sitting at the table with all of them, hearing their stories. And when I moved back to New Mexico, taking Mom with me, the tradition ended. Uncle Mark died about seven months after we moved and then Mom died about five months after that. Suddenly, the tradition was just a memory, but one I am lucky to have. We can’t ever get the time back with our loved ones.
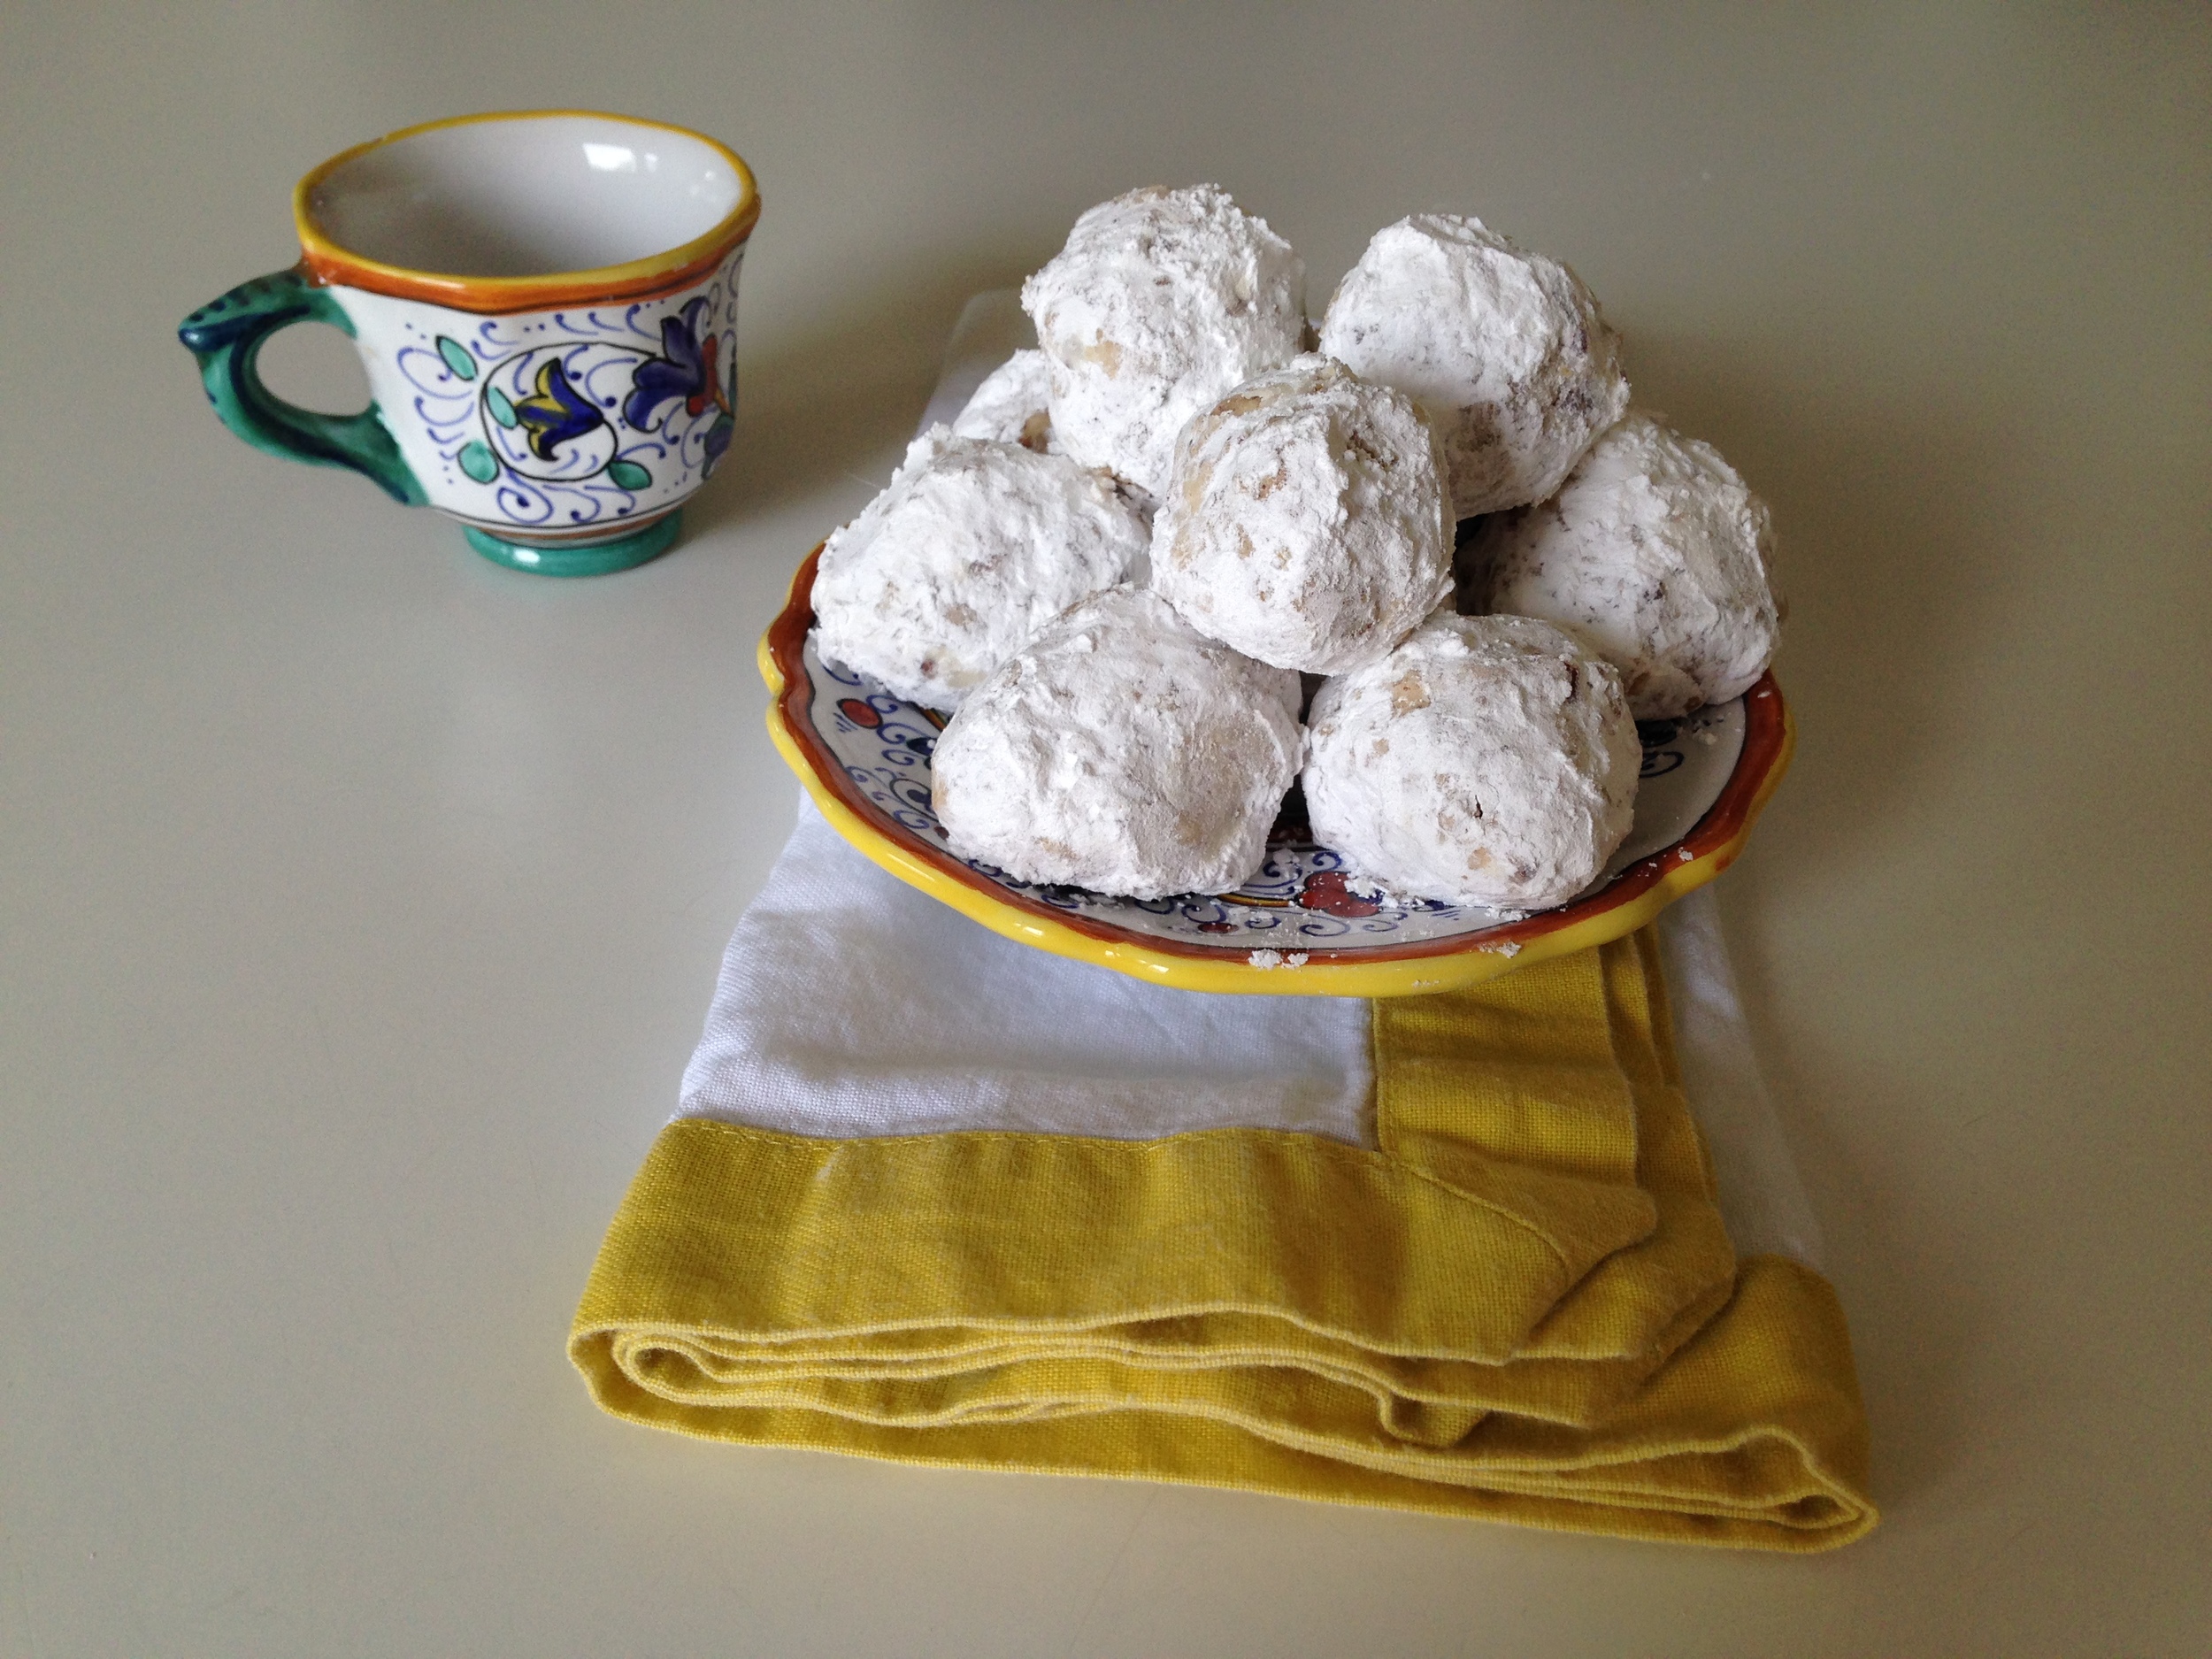
Every year Auntie Virgie bakes up a storm of Christmas cookies and for me she would fill a small green tin with candy canes on it and give it to me. I’d keep it until the next Christmas and we would repeat the process. I had two favorites: her pecan balls and a refrigerator cookie that’s so light it melts in your mouth.
I tried the recipe with walnuts, not being much of a pecan fan, but this year I realized there is no replacement for the pecans. They give the balls the great flavor that make them hard to stop eating.
Auntie Virgie’s Pecan Balls
6 Tablespoons shortening
½ cup butter
¼ cup confectioner’s sugar
1 teaspoon vanilla
1 Tablespoon milk
2 cups sifted flour
2 cups coarsely chopped pecans or walnuts
Cream shortening and butter together, add sugar and cream until light. Add vanilla and milk, blend well. Mix in flour and nuts to creamed mixture, blend well. Roll into small balls. Bake 25-30 minutes until lightly browned at 325 degrees. Cool and roll in confectioner’s sugar.
Memories of Mom: The Cookie Press

These cookies are not going to win any awards for presentation and I definitely wouldn’t invite Gordon Ramsey over to eat any. But they represent something else to me: Mom.
Every year this was the one item on the list we could count on Mom to do at Christmastime, even in the last years when she didn’t go out to buy us cards. At least she still made the cookies. When her original Mirro cookie press broke, we found her a new one at an antique store.
But I will be the first to admit they are not my favorite recipe to make simply because of the cookie press. The dough has to be at an exact temperature for the cookies to come out perfectly. I used the trigger-operated press once but I never found it to be easier to use and now that Mom has died, I have her second generation press.
However, if I wanted any of her cookies this year, I had to make them. While the they are made of cookie basics (flour, sugar, butter), these also have almond extract which gives them that distinct flavor. And in my laziness, I combined the two colors of dough but found that they actually create tie-dye looking cookies.
Mostly, this was about eating the cookies and tasting the memories that came with them.
Mirro Cookie Press Recipe
2 ½ cups flour
¼ teaspoon baking powder
1 cup butter
¾ cup sugar
1 egg
1 teaspoon almond extract
green and red food coloring
decorating candies
Sift together flour and baking powder. Cream butter; add sugar gradually and cream thoroughly. Beat in egg, almond extract, and food coloring. Gradually blend in dry ingredients. Fill cookie press. Form cookies on ungreased baking sheet. Decorate with candies. Bake 10-12 minutes at 375 degrees. Makes 6-7 dozen cookies.
Red Velvet Cake with...Beets? Carob?
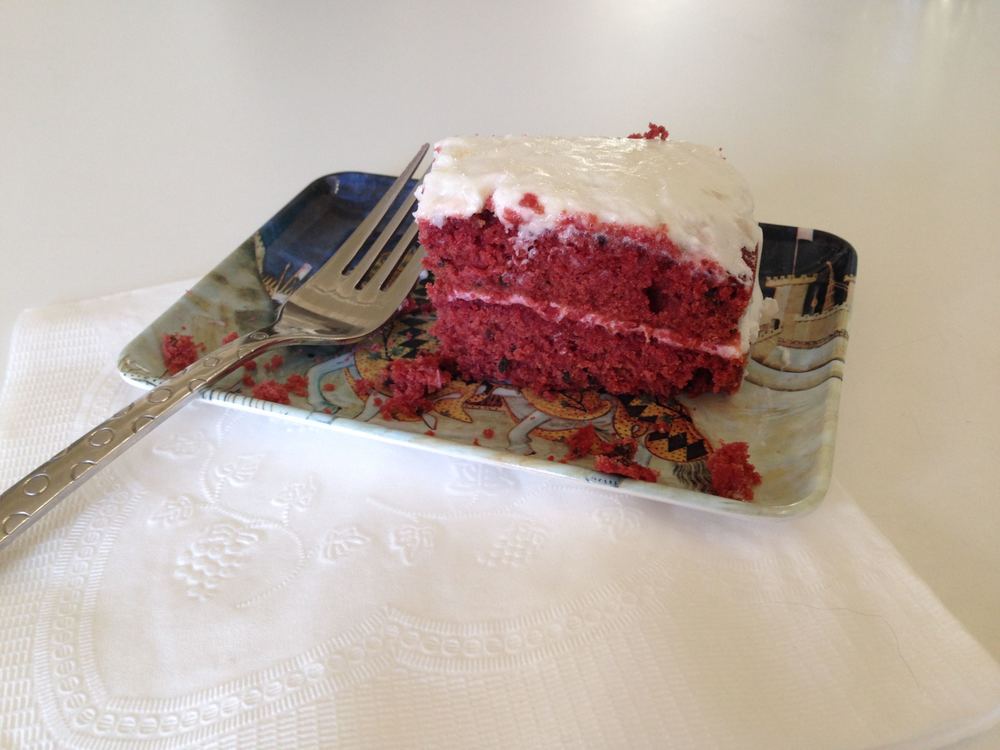
Periodically I will talk about the challenge I always faced when I was very into running in high school and trying to eat better: I wanted to use better ingredients and find more nutritional density to my food but it was almost impossible in the late 1980s.
My fiancé and I were talking about this a little while ago. He said, "It wasn't just that you didn't have the access to ingredients but you also didn't have access to the recipes."
While I would make pizza using wheat flour, I knew of all most no one else who did that (outside of Rocky Rococo Pizza, a Wisconsin chain that had opened in the next town over from mine in Illinois).
Now there is so much out there and I'm willing to explore all sorts of ways to make my food not just be nutritionally better but also have unique flavors.
For a dinner party across the street yesterday, I used the Cooking Light recipe for red velvet cake that uses beets for the color. However, instead of using cocoa, I put carob powder in my version. While I had some issues with the recipe (I don't believe there was enough frosting or filling), I was very happy with the outcome and the taste which wasn't overly sweet but brought together several foods one might not consider before. I also like the lightened calories and fat content- including using Greek yogurt in the filling.
Carob Peanut Butter Brownies

Ah, the carob peanut butter brownie.
I started making carob brownies in my quest to create something for myself that didn't include chocolate and was a bit healthier than the regular brownie. It started with cookies and branched into brownies when I realized it was an easier way to make a dessert for a gathering (it happened to be a Tupperware party I held last fall).
I took a peanut butter cookie recipe that has no egg and used wheat flour and altered it with carob plus upped the ingredients to make a thick, moist brownie.
And honestly? It's one of my favorites. When I need a sugar fix, I know I'm getting better nutrition here (flax! oats!) than with many other sweet desserts.
Carob Peanut Butter Brownies
1 cup whole wheat flour
½ cup ground flax seeds
1 cup quick oats
1 cup brown sugar
2 teaspoons baking powder
1 teaspoon baking soda
2 teaspoons vanilla
4 tablespoons canola oil
2 tablespoons applesauce
½ cup maple syrup (minimum)
½ cup peanut butter, creamy style
2 cups carob chips
Preheat oven to 350 degrees F. Mix all ingredients in a large bowl. I usually add more maple syrup and extra carob chips. Bake in greased square pan 35-40 minutes until inserted toothpick comes out clean. Cut after the brownies have cooled and thickened.
Evolution of My Cooking: Perfecting the Yield

As I continue to write in the Food & Wisdom Diary, I'll be sharing the evolution of my cooking: how I came to be the cook that I am and how it intersects with my life.
To prepare for approximately 70 people coming to our engagement party this Saturday night, I've been baking cookies for the past month, freezing them as I go along. On Saturday I made the Chewy Molasses Cookies from the latest issue of Cooking Light.
Yes, the cookies turned out great but even greater was that this was the first time I made a batch of cookies that came out in the exact yield that the recipe called for. I doubled the batch and ended up with 48 cookies, double the 24 the recipe says.
Lately I've been finding that years of making mistakes and just plain cooking and baking are paying off: I'm able to make better decisions about changes to make and mistakes have taught me things not to do. And apparently I'm also able to judge exactly how big 1 1/2 tablespoons is when I bake.
Practice does finally make perfect.
Love and Tiramisu

In 2005, when I went to Europe for the first time, I visited my junior high pen pal Catia in Luxembourg. She taught me how to make tiramisu and sent me back over the pond with several packages of lady fingers.
Last year on my first date with Greg at the Indian restaurant down the street, over my saag paneer, he invited me out for a second date. But this wouldn't be just any second ate: he asked me to go to a party his friends were having. That meant it was trial by fire since we barely knew each other.
Then he proceeded to tell me he was supposed to bring a dessert to go with the Italian theme. He said he was going to buy something. While I knew he was a forty-something bachelor, I was horrified he would consider buying a dessert and offered to make tiramisu. Not knowing me and believing it was too much time, he insisted I didn't do it.
But I did.
It took some work on my part to find lady fingers (World Market is the best place) nor did I have enough time to make them. But the dessert was a hit and his friends told me he could definitely bring me back to future parties.
Instead of making something traditional yesterday for Thanksgiving, I made pumpkin tiramisu. I love pumpkin and I'm always looking for new ways to use. I was short a package of lady fingers (something I didn't realize until about 5:30 pm Wednesday night- a time when I was not going near any store!).
Once again, the tiramisu was a hit. I didn't use the cream topping- to me it's overkill- nor the shavings. The great part about pumpkin is that it's very flavorful and with the sugar and cream, becomes just sweet enough to become a delicious dessert.
Greg told me I will need a trifle bowl if I want to continue to make desserts and when I offered to add one to our wedding registry, he said, "Anything that will encourage you to make more desserts."
You can find the Food & Wine pumpkin tiramisu recipe here.
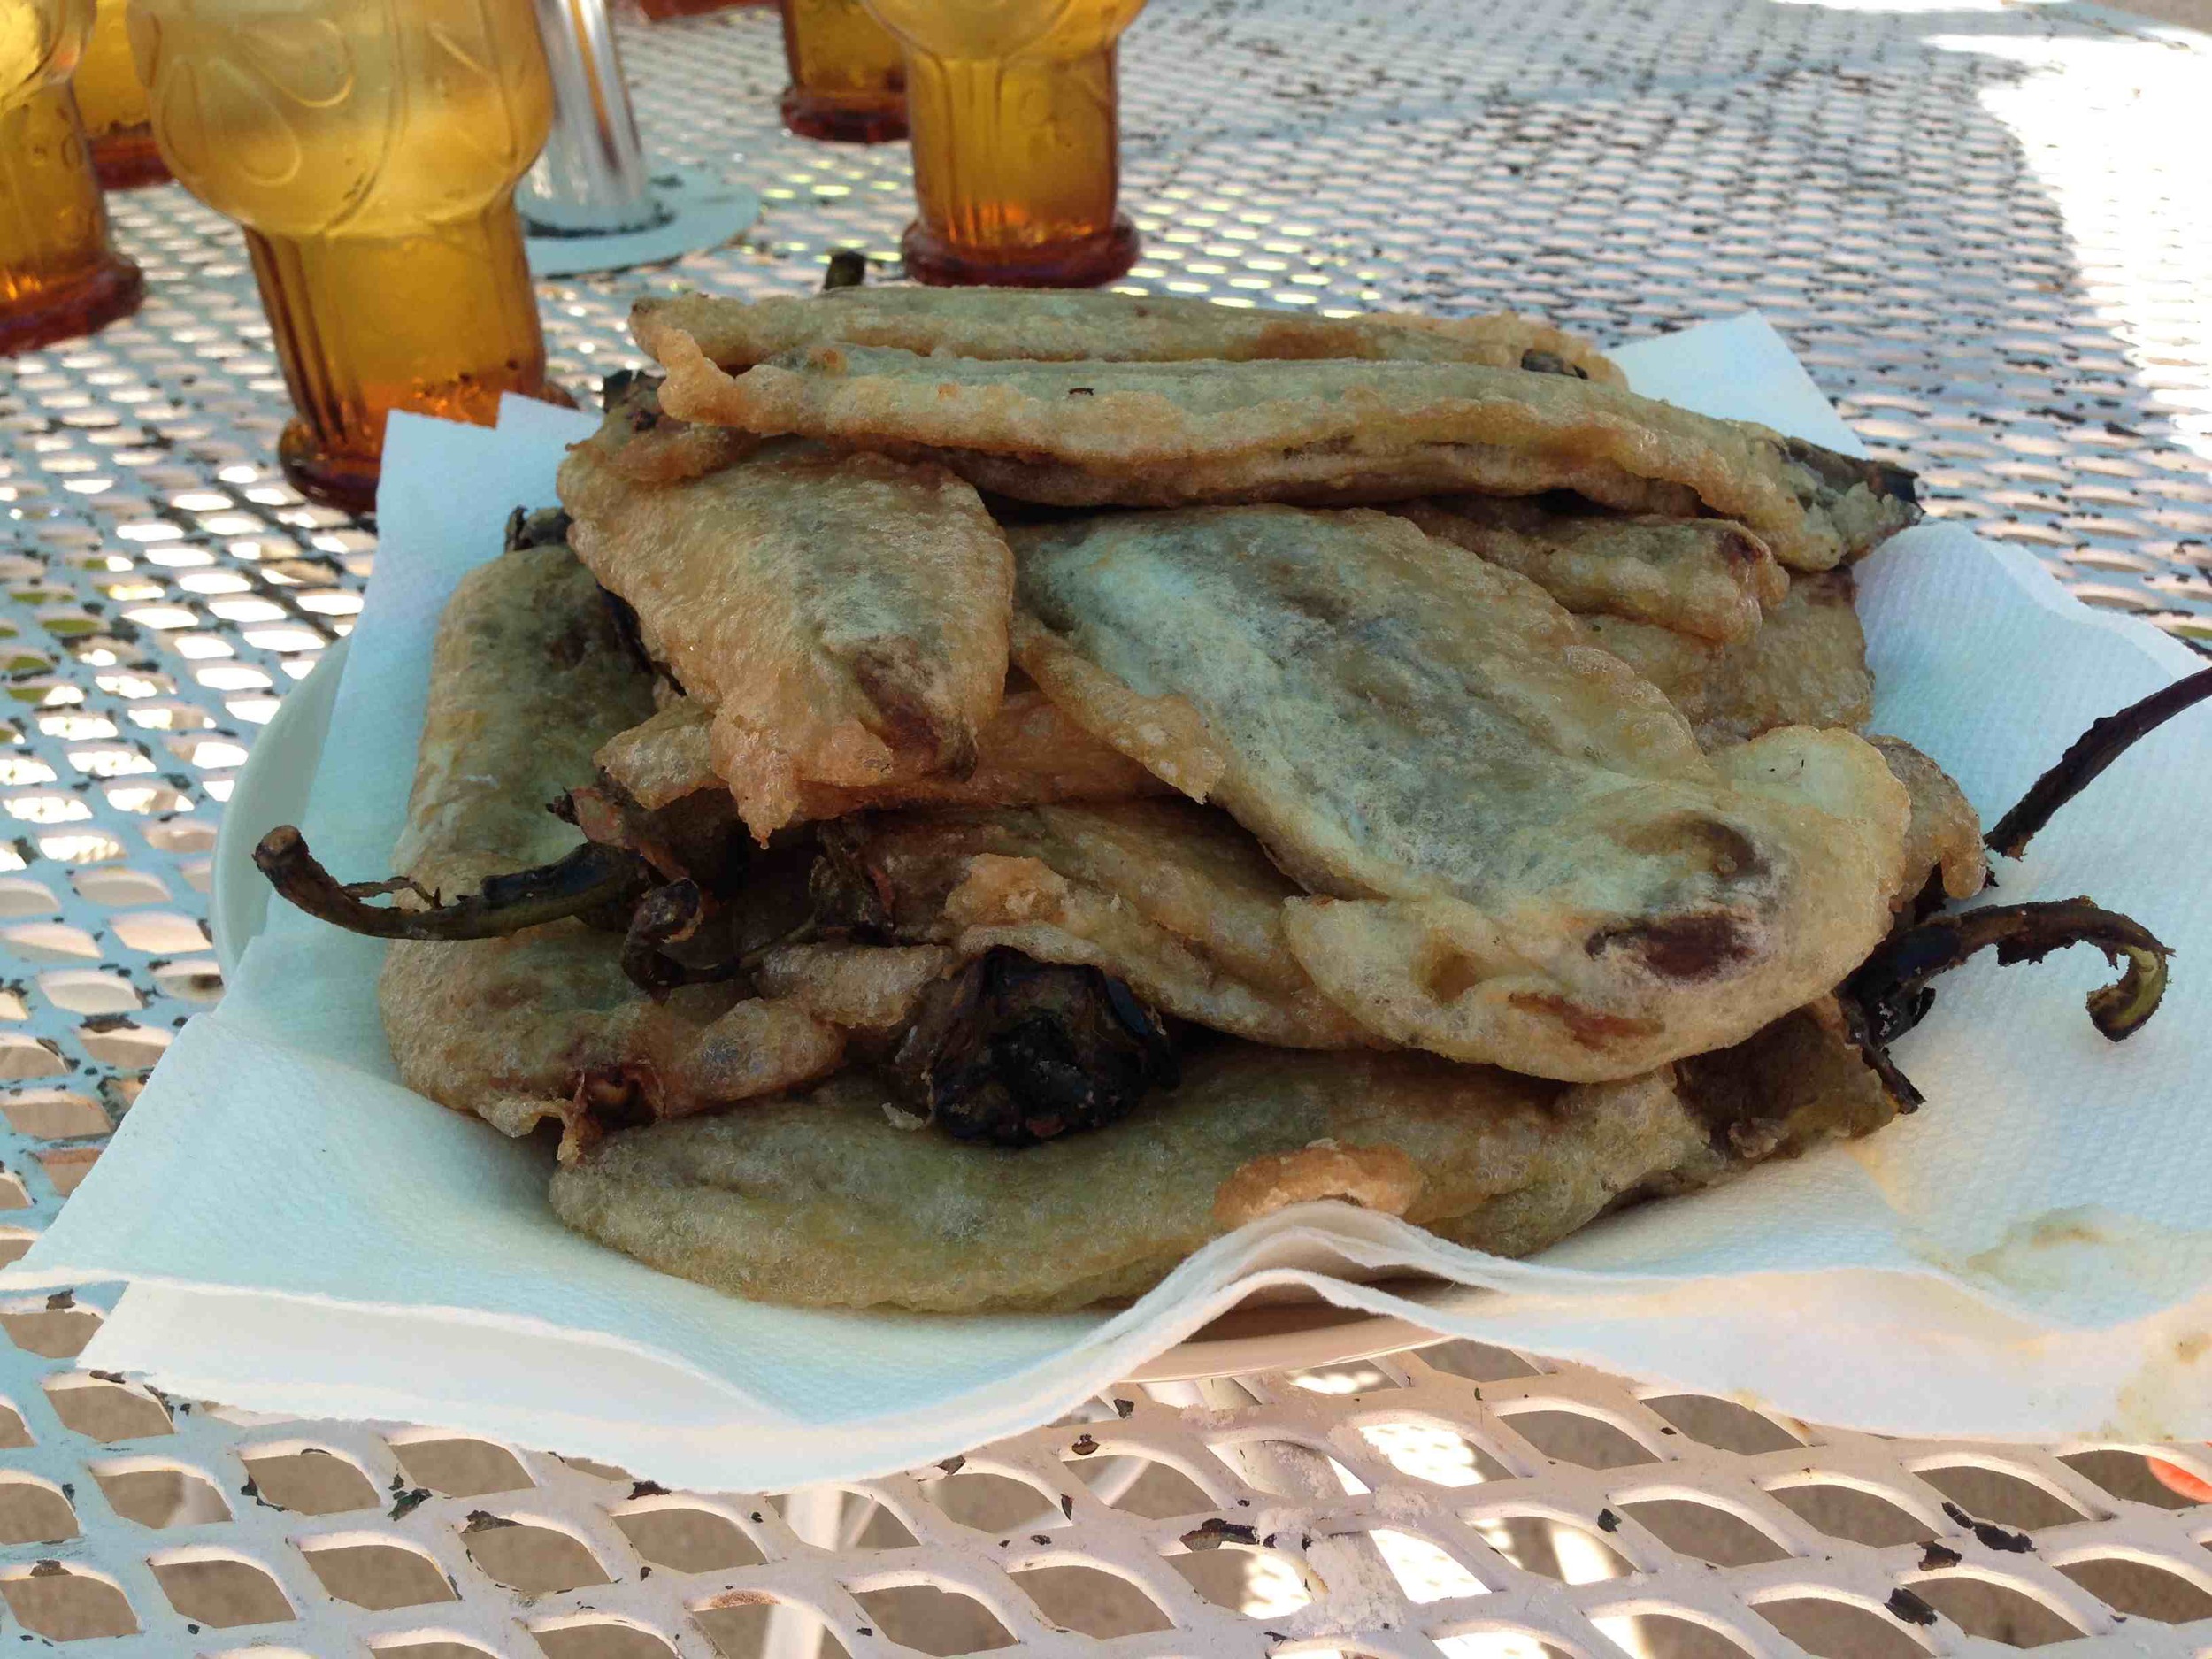
New Mexico Cooking Lessons: Chile Rellenos
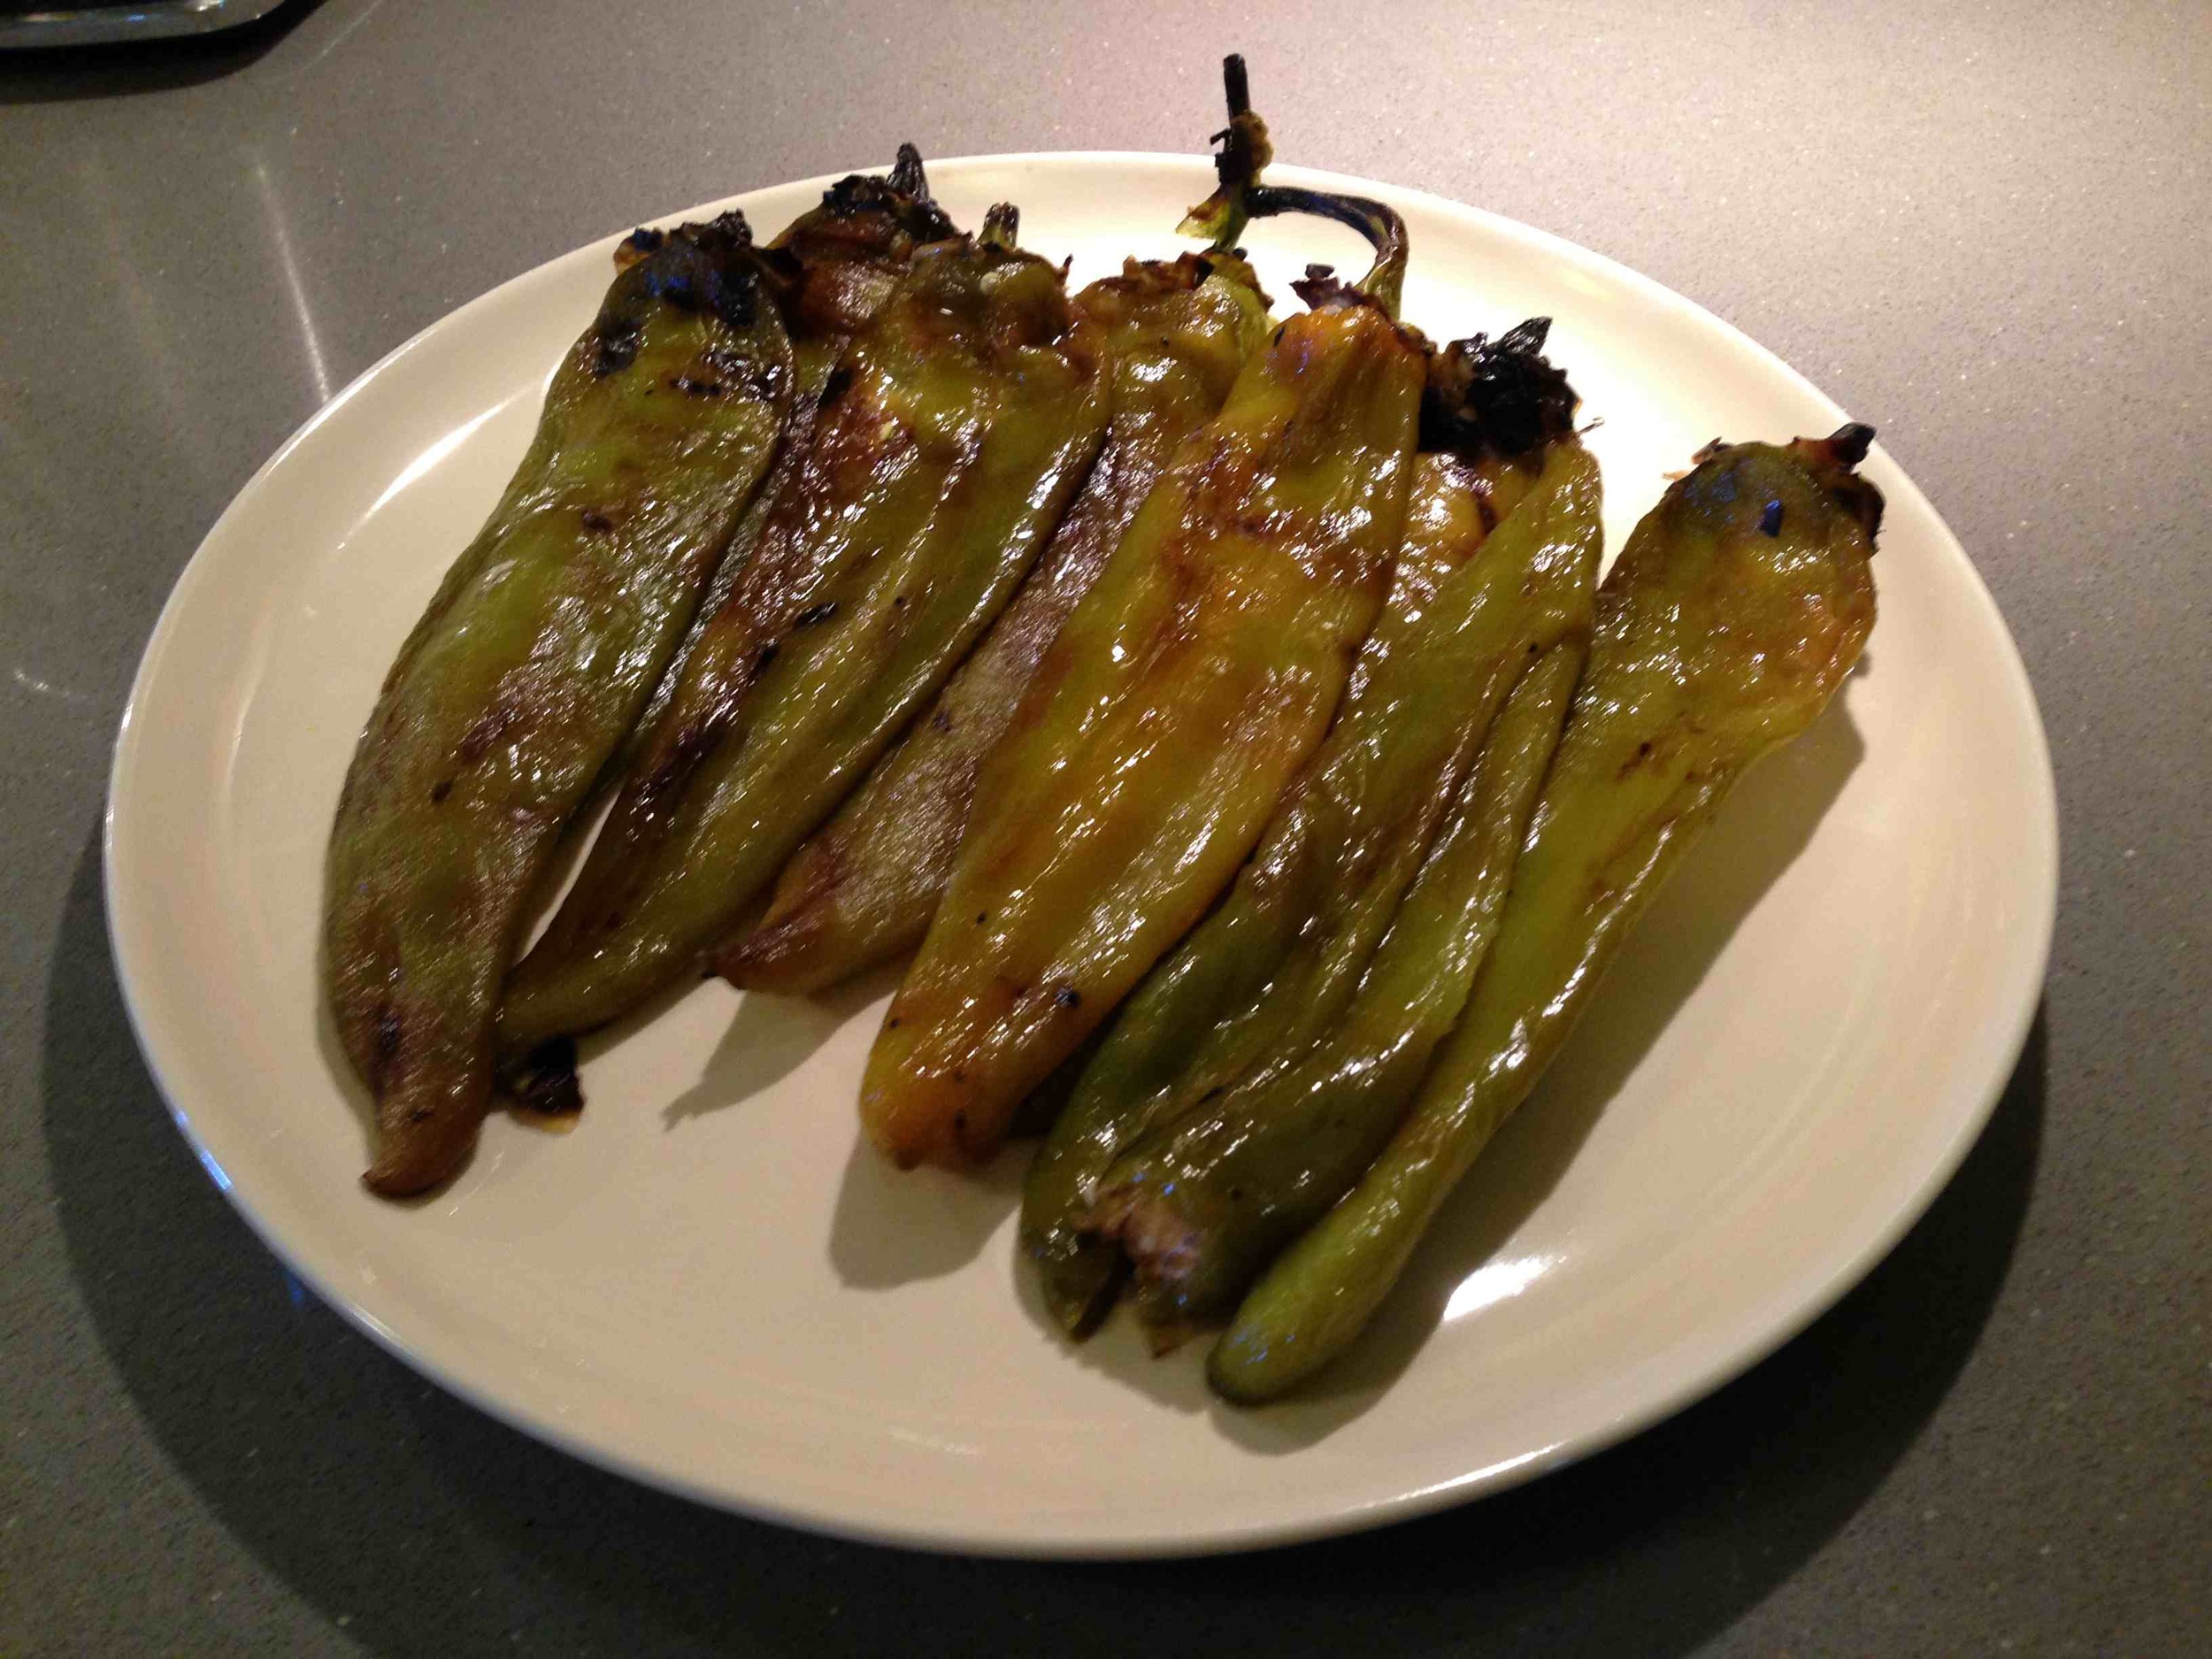
I failed miserably at making chile rellenos last winter. While I had been cooking up a storm of dishes IMG 2742I had learned when I lived in New Mexico to treat my suburban Chicago neighbors, the time that I made chile rellenos I missed a major step: beating the egg whites until they are fluffy. I'm not sure if the recipe I used even said to to do that. I simply dredged them in flour and then soaked them in beaten eggs. But after I moved back to Albuquerque my friend Veronica came to the rescue when she told me it's a dish she sometimes make, one that she learned in her native Mexico.
We spent Saturday afternoon creating the steps below (complete with a short video!) of how to make chile rellenos so you can avoid the embarrassment I endured several months ago.
For this dish Veronica used:
- 15 green chiles (they are more easily found throughout the country and not just in New Mexico anymore)
- 10 eggs
- 1 pound of mozzerella cheese
- oil for cooking

The chiles should be roasted on the grill or on a gas stove to remove the skins. Be careful not to IMG 2745touch your eye or any other sensitive part of the body during this process as the seeds are hot! After roasting, I run my chiles under cold water to remove the skins but Veronica slathers them in oil for the same outcome.
Once the chiles are cleaned, she put a small slice in them and slid a piece of cheese inside the chile. IMG 2748At this time, the tops of the chiles could be removed as well; the seeds can be hot for those you not used to this type of cooking!
The key step (the one that I missed) came next. She mixed ten egg whites until they were fluffy, at the end adding back two yolks for color.
With the chiles stuffed, we moved outside where I placed a cast iron pan filled with oil (she chose olive oil) on the gas burner and heated it. Veronica had filled a plate with flour and she first dredged the chiles and then soaked them in the egg mixture before taking them to the grill. You must move quickly in this process before the egg mixture disintegrates. See the video for more instruction. The oil should be hot and the chiles covered as completely as possible. Fry them until they are brown, just a few minutes on each side and serve with a chile sauce or salsa. The salsa shown in the finished dish is sauteed onions, garlic, chipotle peppers, and tomato sauce.


Recent Posts

Michelle's other website - Chelle Summer - is filled with writings of hope and encouragement while to helping others find their way with love and compassion.